A photo and video slideshow turns a folder of pictures and short clips into one video you can send to family, play at a party, or post online. Photos give you the best single moments; a few seconds of video between them add movement and sound, so the result feels alive rather than like scrolling through an album. Music ties it all together.
This guide covers the whole process: planning the slideshow, finding the right rhythm for photos and clips, building it in Deus.Video from a template, and making one from scratch. All screenshots come from one demo project, a 24-second family year in four photos and two clips, built on a ready-made slideshow template with stock media in place of family pictures. Follow along with your own.
Plan Your Slideshow Before You Edit
A slideshow is quick to assemble once the material is ready. Most of the time goes into choosing what to show, so start there.
- Where it will be watched. A TV, a laptop, YouTube, or a projector at a party need a horizontal 16:9 frame. Reels, Shorts, TikTok, and Stories need a vertical 9:16 frame. Pick one before you start: the frame decides which photos work.
- The story. One sentence is enough: "our year", "Mila turns seven", "fifty years together", "the puppy's first year". It tells you which pictures belong and which don't.
- The photos. Put all candidates in one folder and keep only the best shot of each moment. Ten similar photos of the same cake slow the slideshow down; one good one says everything. For a horizontal video, prefer horizontal photos: a vertical photo in a 16:9 frame is either cropped hard or shown with empty sides.
- The clips. Short videos are what set a photo and video slideshow apart, so choose them on purpose: a laugh, blowing out candles, the first steps, a wave. Three to six seconds of each is usually enough.
- Music that suits the mood and that you have the right to use.
Length follows from the material. These numbers work well in practice:
- 3–5 seconds per photo, a little longer for a photo with a caption to read.
- 15–60 seconds for a slideshow for social media or a message to friends: 5–12 photos and a couple of clips.
- 2–4 minutes for a birthday, anniversary, or family slideshow played at an event. That's roughly 30–50 photos; go longer only if every picture earns its place.
Find the Rhythm: Photos, Clips, and Music
A slideshow where every photo stands still for the same time and then cuts to the next one gets tiring quickly. Three things keep it watchable: movement inside the photos, clips between them, and transitions that link scenes together.
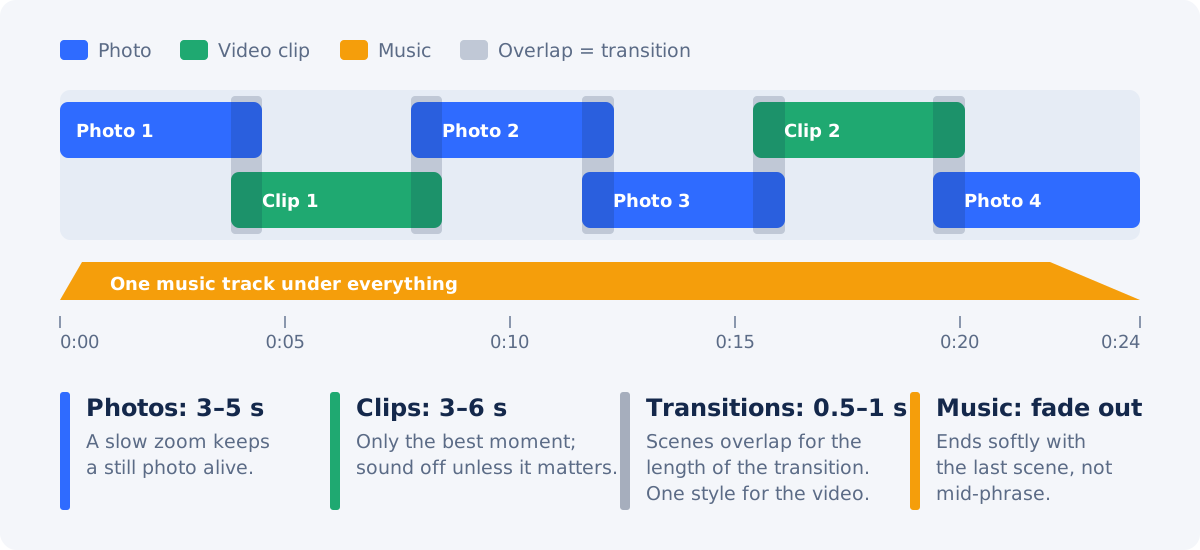
- Give photos a slow zoom. A scale change of a few percent over the length of a photo, often called a Ken Burns effect, makes a still picture feel like footage. Slideshow templates have it built in.
- Use a clip every two or three photos. Clips are the breathing points. They work best for moments that need motion: dancing, running, laughing, opening a present.
- Keep one transition style. A soft dissolve of half a second to a second suits most family and event slideshows. A slide feels more playful. Mixing five different transitions makes the video look like a demo of effects.
- Choose an order. Chronological works for a year, a childhood, or a relationship. Grouping by theme (people, places, food) works for a trip or an event. Saving the strongest photo for the end gives the slideshow a finale.
How to Make a Photo and Video Slideshow in Deus.Video
The steps below use the full Deus.Video editor and the same demo project throughout. The fastest way to a polished result is a template where the photos and clips are already timed, animated, and captioned, so the demo starts from one. If you want to place every photo yourself, see making a slideshow without a template below.

1. Start From a Slideshow Template
Browse the video slideshow templates. Some are built only for photos, such as a property tour, a before-and-after renovation, or a black-and-white contact sheet. Others mix photo and video slots, which is what you need when you have both. Pick one whose frame, length, and mood fit your story, and on the template page click Use this template. The editor creates a new project from it, and every photo, clip, text, and track becomes an ordinary element you can change.
The demo uses the Our Year family photo and video album: 16:9, 24 seconds, four photo slots with a slow zoom, two clip slots, a month, title, and caption for each scene, and a 0.7-second dissolve between scenes.
2. Replace the Template Photos With Yours
While the video is paused, every photo you're meant to swap carries a Replace photo badge on the canvas with the slot name and its length, for example "Photo 1 (breakfast) · 4.5 s". Move the playhead to a scene, click the badge, and the Replace Image panel opens. Upload a file, pick one from My uploads, or search the Stock library.

The other ways lead to the same panel: right-click the photo on the canvas or the timeline and choose Replace image, or select it and click Replace image in the Edit Image panel. You can also drag a file from your computer, or a thumbnail from the library, straight onto the photo. The demo uses all four ways, one for each photo.
Only the picture changes. The new photo fills the same frame and keeps the slot's position, timing, row on the timeline, and animations, including the slow zoom, so the captions stay on top and the scene still moves. One Undo brings the original back. Once a slot holds your photo, its badge disappears, so the badges that are left show you what still needs replacing.
A photo slot takes a photo, and a clip slot takes a video. If you want a clip where the template has a photo, pick a template with more clip slots, or add the clip yourself as described in the section without a template.
3. Replace the Template Clips
Clip slots work the same way, with a Replace clip badge and a Replace Video panel. Stock results are filtered to match the frame of your project (Landscape for a 16:9 video), and each thumbnail shows the clip's quality and length. The demo replaces a park scene with children blowing soap bubbles and a cooking scene with a girl putting cookies on a tray.

The new clip keeps the slot's timing, so if it's longer than the scene, only its first seconds play. If the moment you want is later in the clip, trim it in the editor. Note the clip's Start, then drag its left edge on the timeline to the moment you want: the beginning of the footage is cut off. Turn on Keep length in the Edit Video panel, type the noted Start to move the clip back into its scene, and drag its right edge out to the scene's end again. Or cut the moment out first with the Trim Video tool and put the result in the slot; how to extract a clip from a longer video shows how. Stock clips come in muted, and clips in templates keep the template's sound settings, so the music isn't fighting with background noise. If a clip's own sound matters, such as a "happy birthday" or a first word, raise its Volume in the Edit Video panel.
4. Check the Order and Timing on the Timeline
Select a photo or clip on the canvas, and the timeline scrolls to its row. Photos and clips sit on their own rows, each starting slightly before the previous one ends. That overlap is the transition. A replaced slot keeps its name and adds the name of the new file, for example "Photo 1 (breakfast) · Unsplash — Family eating at the table", so you can still tell which scene is which.

The template's order and timing already work, so in most cases you only swap the pictures. To show a photo longer, drag the edge of its block on the timeline; clips snap to each other's edges (hold Alt to place freely). A template project keeps its length: anything that runs past the end is cut, and the editor offers to extend the project when that happens.
5. Write the Captions and Dates
Open the Text panel. The Texts in this video list shows every text in the project as a field, with the time it appears on screen. Click a field and the playhead jumps to that moment while the text is outlined on the canvas, so you always see what you're changing. Type your words; one-line labels grow wider to stay on one line.

Keep captions short: a title of two to five words and one line under it. Viewers have about four seconds per scene and are also looking at the photo. To change a font, color, or effect, select the text on the canvas and use the Edit Text panel. How to make text readable on video covers contrast and placement.
6. Set the Transitions
Select a photo or clip and scroll the Edit Image or Edit Video panel to Transition. Choose None (cut), Dissolve, Slide from right, Slide from left, or Slide up, and set the length from 0.2 to 2 seconds. The hint below the field names the previous scene, which keeps playing under this one during the transition; the editor extends it for you.

The demo keeps the template's dissolve on every scene. If you change it, change it on all scenes to the same style and length.
7. Add Music
Templates come with a music track. To use your own, open the Audio panel, add a track, and delete the template's one. Select the track on the timeline to open Edit Audio, where you set the Volume, Fade in, s, and Fade out, s. The demo sets a 0.5-second fade in and a 2-second fade out, so the music starts gently and ends with the last scene instead of stopping on the final frame. Each fade then shows as a slope at that end of the track on the timeline, so you can see it without opening the panel.

In a template project, a longer track is cut at the project's end, which is exactly where the fade-out helps. When clips with their own sound play over music, lower the music or the clip; how to add background music without drowning out dialogue explains the balance. For a quick track on a finished video, the Add Audio to Video tool also works.
8. Preview and Export
Play the whole slideshow from the start. Check that every caption is readable before the scene changes, that no photo is cropped in an unfortunate place, and that the music ends with the last scene. Then click Download video, choose the resolution, and click Export video. The dialog preselects the best resolution your plan allows; the free plan exports at up to 720p with a watermark. See plans and pricing for the current limits.

You don't have to keep the page open while the video exports: if you're signed in, an email tells you when it's ready. If the file is too large to send in a messenger, shrink it with the Compress Video tool.
Make a Slideshow Without a Template
A template saves time, but a blank project gives you full control: any number of photos, your own order, timing, and style.
- Open a new project and set the Size in the Project panel first: YouTube (16:9) for a horizontal slideshow or TikTok (9:16) for a vertical one.
- Upload your photos in the Image panel and your clips in the Video panel. A new photo is placed at the playhead and lasts 5 seconds, so move the playhead to the end of the previous scene before you add the next one, or drag the clips into place afterwards; they snap together edge to edge.
- Check that each photo fills the frame, and adjust Horizontal zoom and Vertical zoom in the Edit Image panel if it doesn't. To give it a slow zoom, add keyframes for Horizontal zoom and Vertical zoom at the start and end of the photo, a few percent apart; how to add a pan and zoom effect walks through it.
- Set a Transition on every scene after the first, the same as in step 6 above.
- Add titles in the Text panel, music in the Audio panel with a fade out, and export.
If you only need to join a few clips into one file, the Merge Videos tool is quicker; how to combine multiple videos into one compares the options. To put a single picture or logo over a video, use Add Image to Video.
Slideshow Ideas by Occasion
The steps are the same for every slideshow; the material, the order, and the mood change. Each idea below links to a slideshow template to start from.
| Occasion | Photos and clips to look for | Order that works | Template |
|---|---|---|---|
| Family year | One moment per month or season, ordinary days as well as holidays | Chronological, month by month | Our Year |
| Birthday | Photos from past years, the party, clips of candles and presents | From the first year to today, ending with a wish | Mila Turns Seven |
| Anniversary | The first photo together, the wedding, home, children, today | Chronological, decades as chapters | Fifty Years |
| Pet's first year | The first day home, growing up, a clip of play or zoomies | Week by week or month by month | Biscuit’s First Year |
| School year | The first day, projects, trips, sports, the last day | By term, ending with a group photo | The School Year |
| Our story, for Reels | Five photos, one from each year | Year by year in a vertical frame | Five Years, Five Photos |
For a birthday video with recorded messages from friends, see how to make a birthday video online. For a trip that you shot mostly on video, see how to make a travel video. For a short video card instead of a slideshow of the whole year, see how to make a Christmas video greeting.
Make a Vertical Version for Reels, Shorts, and TikTok
A horizontal slideshow shows up on phones as a small strip with black bars. For social media, build a separate vertical project: start from a 9:16 slideshow template, or a blank project with the TikTok (9:16) size, and use vertical photos, which suit that frame. Keep it to 15–30 seconds and place captions in the middle of the frame, away from the bottom and right edges, where the apps place their buttons.
To convert a finished horizontal slideshow instead, use the Video Resizer to fit it into a vertical frame with black bars, or Crop Video to cut the middle. For a blurred background instead of bars, use the full editor: add the slideshow to a 9:16 project, add it a second time on a lower row, enlarge that copy until it covers the frame, and turn on its Blur filter, or set a Background color in the Project panel. How to resize a horizontal video for vertical platforms explains when each works.
Common Slideshow Mistakes
- Too many photos. Fifty photos of a weekend make a long video nobody finishes. Keep the best shot of each moment.
- Photos that don't fit the frame. A vertical photo in a horizontal slideshow loses its top and bottom, often including heads. Use horizontal photos for 16:9 and vertical ones for 9:16.
- Everything still. Photos without any movement and with hard cuts feel like a presentation. Add a slow zoom and a soft transition, or start from a template that has them.
- Long clips. A 20-second clip in the middle of four-second photos breaks the rhythm. Trim clips to their best three to six seconds.
- Noisy clip sound. Wind and background chatter over the music sound messy. Keep clip sound only where it adds something.
- Captions that are gone before anyone reads them. Keep text short and on screen for at least two or three seconds.
- Music that cuts off. Add a fade-out of a second or two so the track ends softly with the last scene.
- Copyrighted music. Use licensed tracks, music published for free use, or your own audio, especially if the slideshow will be posted online.
Slideshow Checklist
Run through this list before you export:
- The slideshow tells one story, in a clear order.
- Each moment is shown by its best photo or clip, with no near-duplicates.
- Photos match the frame: horizontal for 16:9, vertical for 9:16.
- No template photo or clip is left: no Replace badges remain on the canvas.
- Clips are trimmed to their best seconds, and unwanted clip sound is off.
- Names, dates, and captions are spelled correctly and are readable in time.
- All transitions use the same style and length.
- The music fits the mood and fades out at the end.
- The whole slideshow has been previewed from start to finish.
Create Your Photo and Video Slideshow
A good slideshow comes down to choosing the best moments and giving them a rhythm: photos that move a little, short clips between them, captions that say what happened, and music that ends softly. Start from a video slideshow template or a blank project, add your photos and clips, and export it for the screen where your family and friends will watch it.
Frequently Asked Questions
How do I make a slideshow with photos and videos?
Choose the best photo or clip for each moment, decide on an order, and put them on one timeline in an online editor. The quickest way is a slideshow template with photo and video slots: replace the template's photos and clips with yours, edit the captions, add music, and export the video.
How long should each photo be in a slideshow?
Three to five seconds per photo works for most slideshows, a little longer for a photo with a caption. Short clips of three to six seconds between photos keep the rhythm. A slideshow for social media usually runs 15–60 seconds; one for a birthday or anniversary party, two to four minutes.
How many photos do I need for a slideshow?
At four seconds per photo, a one-minute slideshow needs about 12–15 photos and clips, and a three-minute one about 40–45. It's better to use fewer, stronger pictures than to include every photo you have.
Can I add music to a photo slideshow?
Yes. In the Deus.Video editor, add a track in the Audio panel and set a fade in and fade out in the Edit Audio panel so it starts and ends softly. Use music you have the right to use, such as licensed tracks or music published for free use.
Can I make a photo slideshow for Instagram or TikTok?
Yes. Make a separate project in the vertical 9:16 size, or start from a vertical slideshow template, and use vertical photos. Keep it to 15–30 seconds and place captions away from the bottom and right edges, where the apps place their buttons.
Can I make a slideshow online for free?
Yes. You can build and export a slideshow in the Deus.Video editor on a free account. Free exports are up to 720p with a watermark; paid plans export in higher resolution without it.