A travel video turns a phone full of clips from a trip into something people will actually watch: a few minutes, or even a few seconds, that show where you went and what it felt like. It works the same way for a two-week road trip, a weekend city break, or a family vacation video for relatives who stayed at home. You don't need professional gear or editing experience. You need good material, a simple story, and an online editor to put it together.
This guide covers the whole process: planning before you edit, choosing a story, assembling the video in Deus.Video, and making a vertical version for Reels, Shorts, and TikTok. The screenshots come from one demo project, a 20-second rail trip from Venice to Naples built on a ready-made travel template. Follow along with your own clips.
Plan Your Travel Video Before You Edit
Most of the work in a good trip video happens before you open the editor. Decide on a few things first.
- Where it will be watched. YouTube, a TV, or a laptop need a horizontal 16:9 frame. Reels, Shorts, TikTok, and Stories need a vertical 9:16 frame. If you want both, plan for both from the start (see the vertical version below).
- How long it should be. This decides how much footage you keep, not how much you shot.
- Which clips you have. Copy everything from the trip into one folder and delete the shaky, blurry, and accidental clips before you start. Rename the keepers so they sort in order, for example
day2-03-ponte-vecchio.mp4. - B-roll and sound. Short shots of details, such as a train window, a coffee cup, waves, or a street sign, connect the big moments. Clips with good ambient sound, like a market, a station announcement, or the sea, are worth keeping too.
- Music that suits the trip and that you have the right to use.
For length, these ranges work well in practice:
- 15–60 seconds for Reels, Shorts, TikTok, or a quick recap for friends.
- 2–5 minutes for a YouTube travel video or a vacation video for family.
- Longer only for a travel vlog with narration, where you talk the viewer through the trip.
The demo is deliberately short: four 5-second scenes, one per city. Short videos are easier to finish, and a finished 30-second video beats an unfinished 20-minute one.
Choose a Story for the Trip
The difference between a travel video people watch to the end and one they skip is structure. A random sequence of pretty shots gets boring quickly; a clear beginning, middle, and end keeps attention. This four-part structure fits most trips:
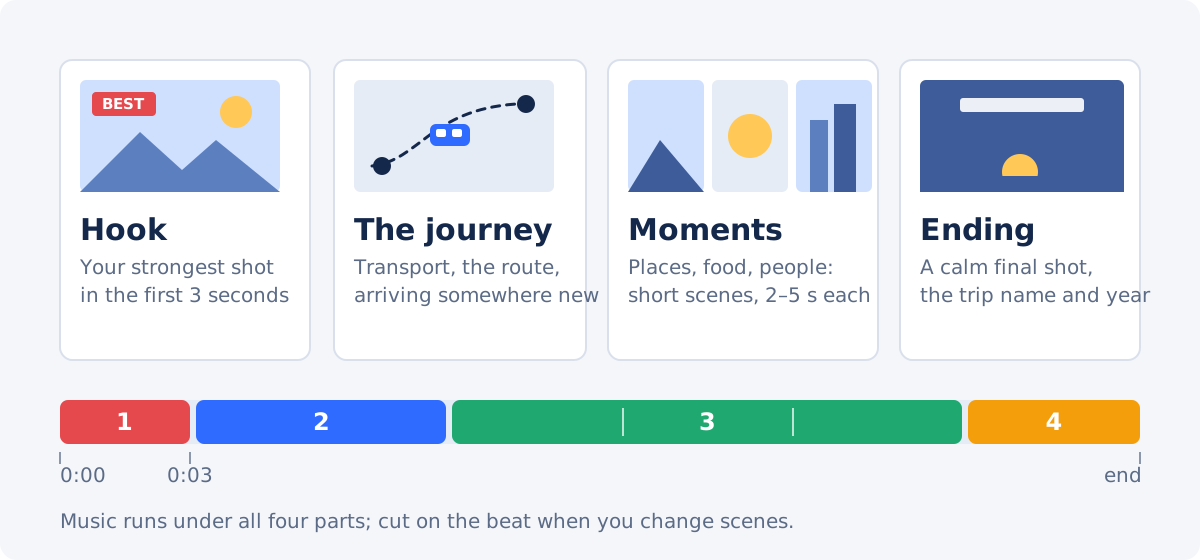
- Hook. Open with your strongest shot, not with packing the suitcase. The first three seconds decide whether people keep watching.
- The journey. A few seconds of getting there: a plane window, a train, a car on a coastal road, a map of the route.
- Moments. The core of the video: places, food, people, and small details, as short scenes of two to five seconds.
- Ending. A calm final shot, such as a sunset, the last evening, or the way home, plus the trip name and year.
Inside that frame, pick an order that matches your trip:
- Chronological, day by day. The simplest option and the best for family vacation videos. The demo uses it: day 1 in Venice, day 4 in Naples.
- Along the route. For road trips and rail journeys: city by city, with the route or the distance on screen.
- One day. Morning to night in one place. Good for a city break or a short Reel.
- Top moments. The five or ten best moments of the trip, in any order. Good for highlights and social media.
How to Make a Travel Video in Deus.Video
The steps below use the full Deus.Video editor and the same demo project throughout. You can start from a blank project or from a template; the demo starts from a template, because that is the fastest way to get a polished result.

1. Start From a Travel Template or a Blank Project
Browse the travel video templates and pick one that matches your trip: a road trip recap, a cinematic slideshow, a vlog opener, or a postcard. On the template page, click Use this template. The editor creates a new project from it, and every clip, text, and track in the template becomes an ordinary element you can change.
The demo uses the Four Cities by Rail template: a 16:9, 20-second postcard with four city stops, a handwritten line for each day, a route with a moving marker, and a kilometer counter.
To start from scratch instead, open a new project and set it up in the Project panel: Size (YouTube (16:9) for a horizontal video, TikTok (9:16) for a vertical one), Duration, and Background. Set the size before you add anything; changing it later means repositioning most elements.
2. Replace the Template Clips With Your Footage
In a template, every clip and large photo you're meant to swap carries a badge on the canvas while the video is paused (Replace clip on a clip, Replace photo on a photo), with the scene name and its length, for example "Scene 1 (valley) · 5.8 s". Click the badge, or select the clip and click Replace video in the Edit Video panel. You can also right-click the clip on the canvas or the timeline and choose Replace video.
The Replace Video panel lets you upload a file, pick one from My uploads, or search the Stock library. Type a place and press Enter. Stock results are filtered to match the frame of your project (Landscape for a 16:9 video), and each thumbnail shows the clip's quality and length. The demo uses stock clips of Venice, Florence, Rome, and Naples.

Only the footage changes. The new clip fills the same frame and keeps the template's timing, its row on the timeline, its animations, and its sound settings, so the postcard stays on top and the slow zoom still works. If your clip is longer than the scene, only the first part plays; if it's shorter, the editor warns you. One Undo brings the original clip back.
Your own files work the same way: drag a file from your computer, or a thumbnail from the library, straight onto a clip on the canvas or the timeline, and it replaces that clip. Photos are replaced the same way through Replace image. Stock clips are added muted, in 1080p when the source has it, and on the timeline they're named after their content, for example "Pexels — Ponte vecchio bridge florence", so you can tell them apart.
3. Trim and Arrange the Clips on the Timeline
Every clip, photo, text, and audio track has its own row on the timeline. A block's position shows when it appears; its length shows how long it stays on screen. Rows higher on the timeline appear in front of lower ones.
- Keep the best seconds. Drag the clip's left edge to where the good part starts and its right edge to where it ends: the footage is trimmed from both sides, and each frame stays where it was on the timeline. To remove a part from the middle, move the playhead there, select the clip, click Split, and delete the piece you don't need. For a long clip you only need a few seconds from, extracting a clip from a longer video explains the approach in more detail.
- Set exact timing. Drag either edge of a block, or type exact Start and End values in the clip's panel; a later Start trims the beginning of the footage, just like the left edge. The playhead and the clip edges snap to the edges of neighboring clips, so scenes line up without gaps; hold Alt to place them freely. Two to five seconds per scene is a comfortable pace for a travel video; the demo uses five.
- Control what's in front. Right-click any element and use the Layer order commands: Bring to front, Bring forward, Send backward, and Send to back, with the shortcuts shown next to them. Use them when a new clip covers your titles, or to put a photo behind a frame.
- Check the order. Click To start and play the video. Move scenes that break the story, and shorten anything that drags.

In a template project, new media is cut at the project's end: a long clip or track doesn't stretch the video, and a message offers to extend the project if you actually want it longer.
If you only need to cut a single file without building a full project, the online Trim Video tool is quicker, and Merge Videos joins several clips into one file. How to combine multiple videos into one covers that route step by step.

4. Add Place Names, Dates, and Captions
Text tells viewers where they are. Useful text in a travel video includes:
- a title with the trip name, for example "Venice to Naples by Rail";
- city or place names as each new location appears;
- a day number or a date;
- short captions about the moment ("got lost in the old town, on purpose");
- a fact that frames the trip, such as the distance, the number of countries, or the days on the road.
The quickest way to change a template's words is the Texts in this video form in the Text panel. It lists every text and counter in the project in the order they appear, with the time each one is on screen. When you click a field, the playhead jumps to where that text is visible, so you see the change on the canvas as you type. Counters get From and To fields; the demo's kilometer counter now runs from 0 to 750 km.

To style a text, click it on the canvas. The Edit Text panel has the font, size, colors, and an Effects list; in the demo, each day's line uses the Typewriter effect, so it types itself out when the clip changes. To add new text, click Add text in the Text panel.
Keep each caption short enough to read twice while it's on screen, and keep it away from the bottom edge, where phone apps place their buttons. A one-line title stays on one line when you replace it with a longer one: the text box widens up to the edges of the frame. Making text readable on video has more tips on contrast and size. For a single title on an existing file, the Add Text to Video tool works too.
5. Add Music and Ambient Sound
Music sets the mood of a travel video more than any effect. In the Audio panel, upload your own track or search the Stock tab, then click + to add it at the playhead. In the Edit Audio panel, set its Start, End, Volume, Fade in, s, and Fade out, s. The demo uses an acoustic guitar track from the stock library, published under CC0. The editor cut it at the end of the 20-second project, and a 2-second fade-out lets it end softly instead of stopping mid-phrase.

- Mute or keep the clip sound on purpose. Waves, a street market, or a train can add atmosphere; wind noise and conversations usually don't. Stock clips start muted; your own clips keep their sound. Use the Mute button next to Volume in the Edit Video panel, or Mute in the clip's context menu.
- Cut on the beat. Scene changes that land on a beat in the music feel natural even without transitions.
- Leave room for voice. If you narrate, lower the music under your voice. How to add background music without drowning out dialogue explains the levels. You can record narration in the editor with Record in the Audio panel; see how to add a voiceover to a video.
- Use music you have the right to use. Commercial songs often get videos muted or blocked on social platforms.
To put music on a finished file without opening a project, use the Add Audio to Video tool.
6. Add Transitions and Motion
Travel footage already moves, so keep effects light. Select a clip and pick a Transition in the Edit Video panel: None (cut), Dissolve, Slide from right, Slide from left, or Slide up, with a duration from 0.2 to 2 seconds. The transition leads into the selected clip from the previous one, which keeps playing underneath until the transition ends. The demo template uses a 0.8-second dissolve between cities, and replaced clips keep it.

- One transition style throughout. A dissolve between every city looks deliberate; a different effect at every cut looks unfinished.
- Slow zoom on still shots. Use the diamond keyframe button next to Horizontal zoom and Vertical zoom to make a photo or a static clip zoom in slightly over a few seconds. The template's clips already have this zoom, and it survives a replacement.
- Titles and stickers. For other elements, the Animations section sets how they enter (In), leave (Out), or move continuously (Loop).
7. Preview and Export
Click To start and watch the whole video without stopping. Check that place names and dates are correct, that every caption stays on screen long enough to read, that the music fades out at the end, and that nothing important is cut off at the edges.
Then click Download video. The dialog preselects the best resolution available on your plan, up to 1080p; 4K is there to choose if your plan includes it. Click Export video. On a free account, the video is exported with a watermark at up to 720p; Remove watermark shows the plans that remove it and unlock higher resolutions, and plans and pricing lists the current limits. The demo was exported at 1080p on a paid plan.

You don't have to keep the page open while the video exports: if you're signed in, an email tells you when it's ready. If the file is too large to send in a messenger, shrink it with the Compress Video tool.
Make a Vertical Version for Reels, Shorts, and TikTok
A horizontal YouTube travel video doesn't work as is on Reels or TikTok: it shows up as a small strip with black bars. You have two options.
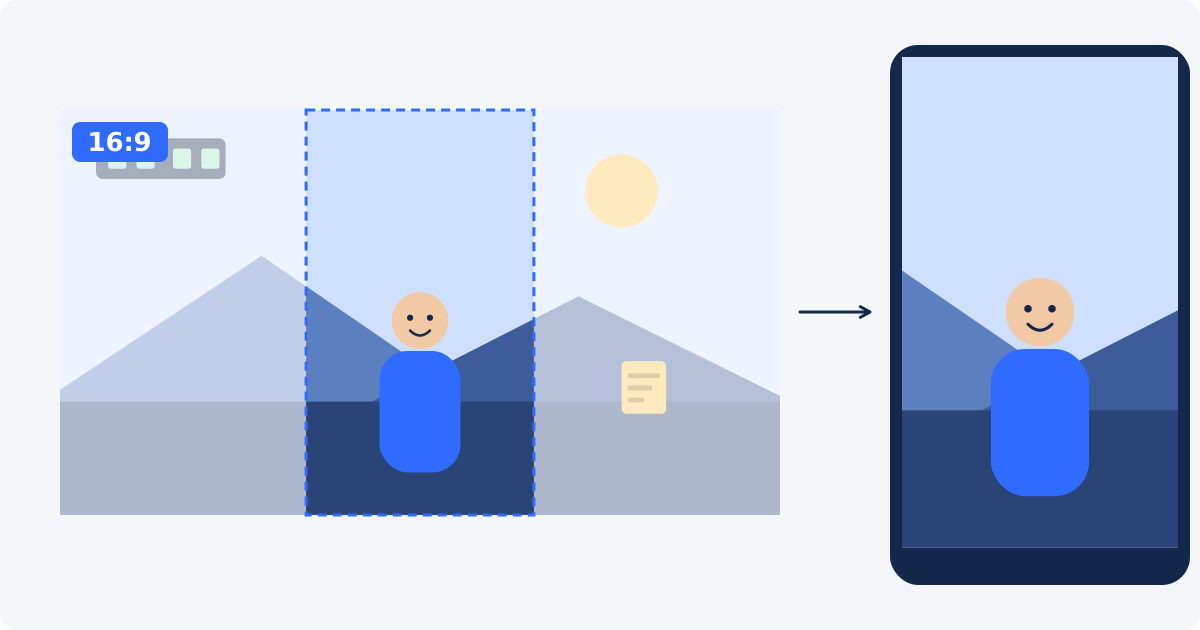
- Make a separate vertical project. Best for the result. Start a project with the TikTok (9:16) size, or pick a vertical travel template, and build a shorter cut of 15–30 seconds from your strongest moments. Place text in the middle of the frame, away from the bottom and right edges, where the apps place their buttons.
- Convert the finished video. Faster. Crop the horizontal video to 9:16 around the subject with the Crop Video tool, or fit it into a vertical frame with black bars using the Video Resizer. For a blurred background instead of bars, use the full editor: add the video to a 9:16 project, add it a second time on a lower row, enlarge that copy until it covers the frame, and turn on its Blur filter, or set a Background color in the Project panel. How to crop a horizontal video to vertical and how to resize it without stretching explain when each method works.
Changing the Size of an existing project in the editor also works, but every element is repositioned proportionally, so check titles and captions afterwards and move anything that ends up off-center or cut off. The same choices apply to a slideshow; how to make a photo and video slideshow covers its vertical version.
Travel Video Ideas by Trip Type
The editing steps are the same for any trip, but the material and the pace change. Use this table as a starting point.
| Trip | Material to shoot | Structure that works | Editing emphasis |
|---|---|---|---|
| Road trip | The road through the windscreen, stops, signs, a map | Along the route, with the distance or the stops on screen | Steady rhythm, music with a driving beat |
| City break | Streets, landmarks, food, details, evening lights | One day, morning to night | Fast cuts, place names as captions |
| Beach holiday | The sea, the sand, slow motion, sunsets | Top moments | Slower pace, ambient sound of the waves |
| Hiking or mountains | The trail, viewpoints, the summit, the group | From the start of the trail to the top | Wide shots, stats such as distance and elevation |
| Family vacation | Kids, shared meals, the hotel, small funny moments | Chronological, day by day | Faces over scenery, calm music, a family photo at the end |
| Multi-city or rail trip | Stations, the view from the window, each city's landmark | City by city, like the demo | The same title style for every city |
Common Travel Video Mistakes
- Starting with the boring part. Packing, the airport queue, and the taxi rarely work as an opening. Open with your best shot and show the journey after it.
- Clips that run too long. A panorama that lasts 20 seconds feels like 60. Keep two to five seconds and trim the rest.
- Too much of the same view. Five shots of the same beach blur together. Mix wide shots, details, and people.
- Shaky or tilted footage. Drop clips you can't watch comfortably, even if the place was beautiful.
- Wind noise and random conversations. Mute clips whose sound adds nothing.
- Music that cuts off. Add a fade-out of a second or two so the track ends softly with the video, not in the middle of a phrase.
- No place names. Viewers who weren't there don't know where they are. Add a short caption for each new place.
- Copyrighted music. Use your own audio, licensed tracks, or music published for free use.
Travel Video Checklist
Run through this list before you export:
- The first three seconds show something worth watching.
- The story has a clear order: chronological, by route, one day, or top moments.
- Every clip is trimmed to its best part.
- Place names and dates are spelled correctly.
- Captions stay on screen long enough to read.
- Unwanted clip sound is muted.
- Music fits the mood and fades out at the end.
- The aspect ratio fits the platform: 16:9 for YouTube, 9:16 for Reels, Shorts, and TikTok.
- The video ends with your last scene, with no empty tail after it.
- The whole video has been previewed from start to finish.
Create Your Travel Video
A good travel video comes down to choosing the best seconds of your trip and putting them in an order that tells a story. Start from a travel video template or a blank project, add your clips, name the places, add music, and export it for the platform where your friends will watch it.
Start making your travel video
Frequently Asked Questions
How long should a travel video be?
For Reels, Shorts, or TikTok, 15–60 seconds works well. For YouTube or a vacation video for family, 2–5 minutes is usually enough. Go longer only for a travel vlog with narration, and only if you have enough varied footage to keep it interesting.
How do I make a vacation video from my phone clips?
Copy all clips into one folder and delete the shaky and accidental ones. Choose a simple story, such as day by day or top moments, then upload the clips to an online editor, trim each to its best few seconds, add place names and music, and export the video.
Where can I get music for a travel video?
Use music you have the right to use: tracks published under free licenses such as CC0, licensed stock music, or your own recordings. The Deus.Video editor has a stock audio library you can search in the Audio panel. Commercial songs often get videos muted or blocked on social platforms.
Can I mix photos and video clips in one travel video?
Yes. Add photos through the Image panel and clips through the Video panel, then arrange them on the same timeline. Give photos two to five seconds each and add a slow zoom with keyframes so they don't look static between moving clips.
How do I make a vertical travel video for Reels or TikTok?
Either build a separate project with the TikTok (9:16) size and a shorter cut of your best moments, or convert the finished horizontal video by cropping it to 9:16 around the subject or fitting it into a vertical frame with black bars. For a blurred background instead, add the video twice to a 9:16 project in the full editor, enlarge the copy on the lower row until it covers the frame, and turn on its Blur filter.
How do I make a travel video file smaller?
Export at the resolution you actually need, such as 1080p instead of 4K, and keep the video short. If the file is still too large for a messenger or email, reduce its size with an online video compressor.