Static zoom versus animated pan and zoom
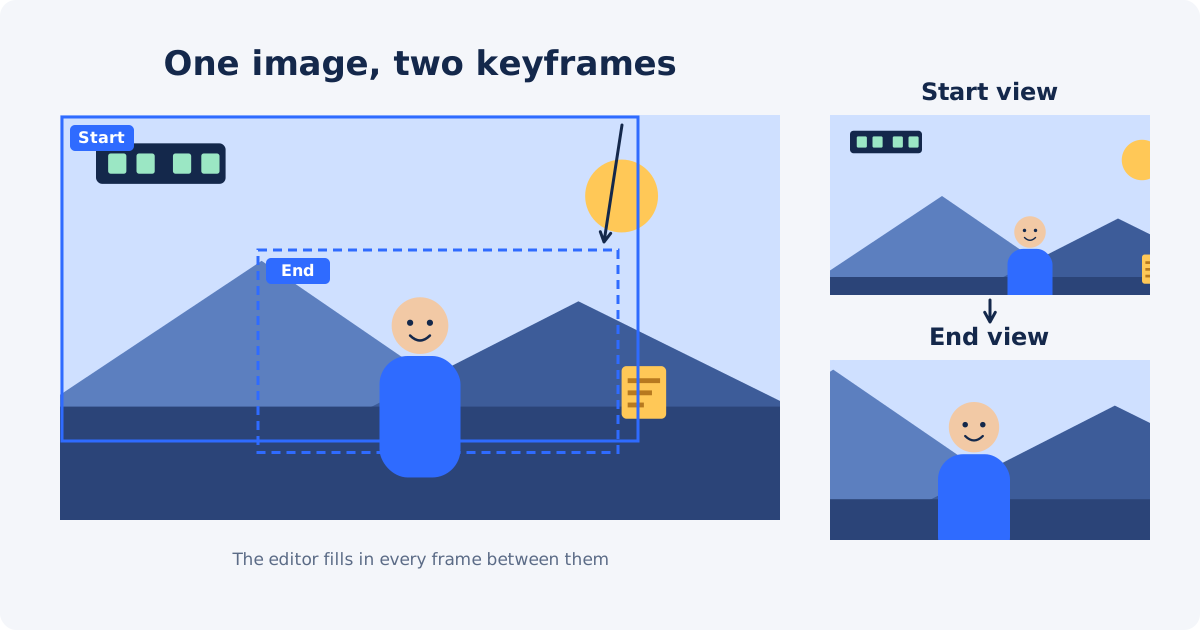
A static zoom enlarges the picture once and keeps that framing for the whole clip. Nothing moves. It is a reframing tool: it fixes a subject that was recorded too far away. The standalone Zoom Video tool works this way, with one zoom level and one position applied from the first frame to the last.
An animated pan and zoom changes the framing over time. A pan moves the visible area across the picture. A zoom changes how much of the picture is visible. When the two values change gradually, the viewer sees what looks like a camera gliding over the image.
The difference matters when you choose a tool. Moving a picture to a new fixed position is repositioning, not panning. For real motion you need an editor that supports keyframes, such as the full Deus.Video editor.
Start and end keyframes
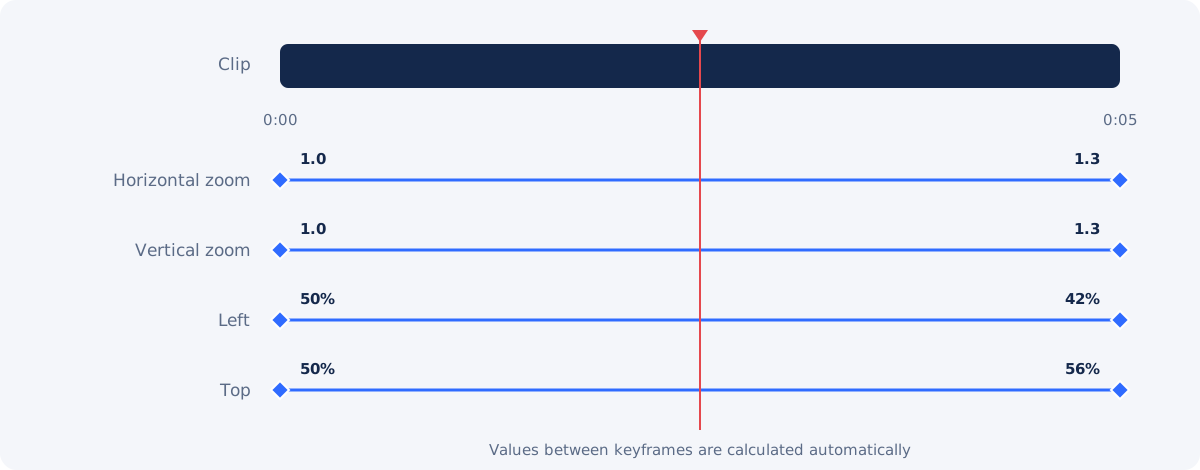
A keyframe is a marker on the timeline that stores the value of one property at one moment. For example: "at 0:00, horizontal zoom is 1.0" and "at 0:05, horizontal zoom is 1.3." Between two keyframes, the editor calculates the intermediate values automatically. This calculation is called interpolation.
A basic pan and zoom needs at least two keyframes for each property that changes. For a zoom, those properties are the horizontal and vertical zoom. For a pan, they are the position values. Properties that have no keyframes stay constant.
Choosing start and end framing
Plan the movement before you touch any controls. Decide what the viewer should see first and what they should be looking at when the move ends. The end frame is the more important one, because that is where attention comes to rest.
- End on the subject. A face, a product, a line of text, or a key detail. Avoid ending on empty sky or a blank wall.
- Keep both frames well composed. Pause on the first and last frame and ask whether each would work as a still image.
- Keep the picture covering the canvas. If the element becomes smaller than the canvas, or moves too far to one side, the empty canvas will show at the edge. Check both keyframes and the path between them.
- Respect the source resolution. Zooming in enlarges a smaller area of the picture. A high-resolution photo can take a stronger zoom than a small one. See our guide on zooming in while minimizing quality loss.
Pan only, zoom only and combined motion
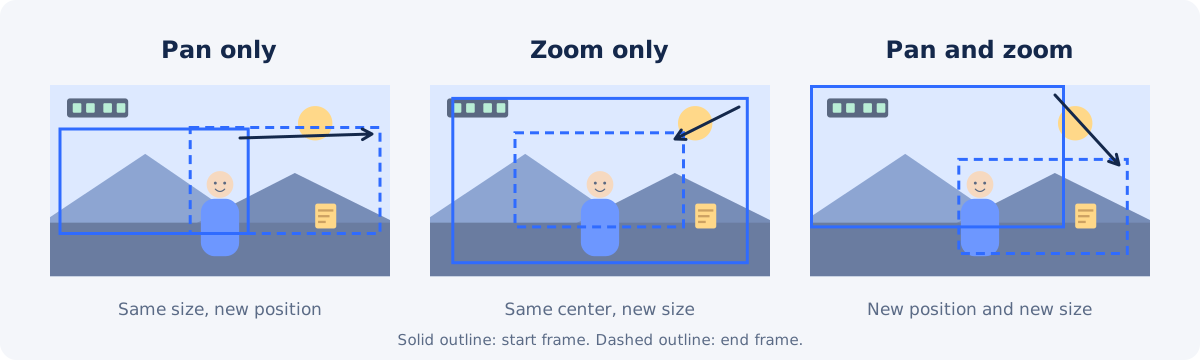
Pan only. The size stays the same and the position changes. It suits wide photos, panoramas, group shots, and long screenshots. The picture must already be larger than the canvas, or there is nowhere to pan.
Zoom only. The position stays the same and the size changes. A slow zoom in builds focus on a subject. A slow zoom out reveals the surroundings.
Combined. Both change at once, so the view travels across the picture while closing in or pulling back. It is the classic documentary move, and it is also the easiest to overdo.
| Effect | Start frame | End frame | Typical use | Common mistake |
|---|---|---|---|---|
| Slow zoom in | Wide | Closer | Introduce a subject | Zooming too far |
| Slow zoom out | Close | Wide | Reveal context | Ending on empty space |
| Horizontal pan | Left | Right | Wide photo or scene | Moving too quickly |
| Diagonal pan and zoom | Wide corner | Closer opposite area | Guided visual story | Distracting motion |
| Static zoom | Same throughout | Same throughout | Fixed reframing | Calling it an animated effect |
Duration and motion speed
Speed is the amount of change divided by the time it takes. The same zoom from 1.0 to 1.3 feels calm over six seconds and abrupt over one. If a move feels rushed, you can either lengthen the time between keyframes or reduce the difference between the values.
For photos in a slideshow, moves of roughly four to eight seconds per image are common. For emphasis inside a tutorial, one to two seconds is usually enough, followed by a hold so the viewer can read. These are starting points. Match the pace to the narration or music.
Easing
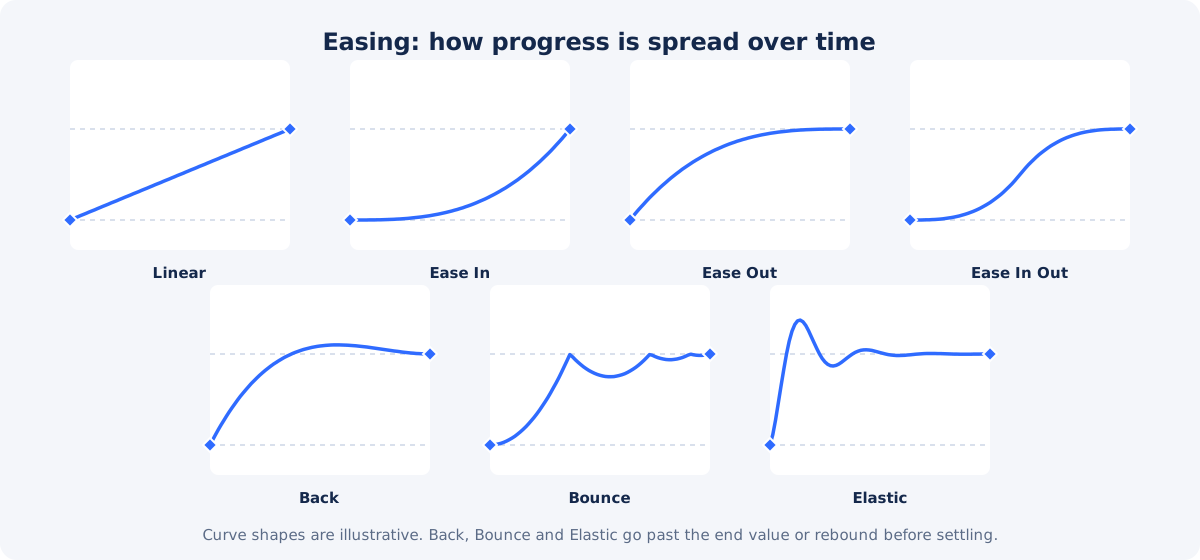
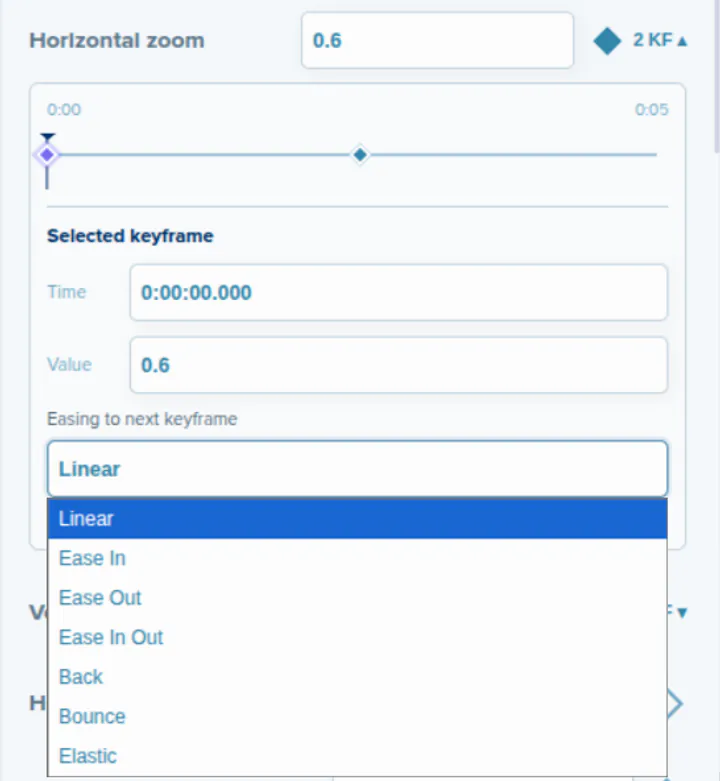
Easing controls how the change is distributed between two keyframes. With linear easing, the value changes at a constant rate, so the motion starts and stops instantly. With eased motion, the change accelerates, decelerates, or both, which looks more like a camera operated by a person.
In the Deus.Video editor, easing is set per keyframe with the option "Easing to next keyframe." It shapes the segment between the selected keyframe and the one after it.
| Easing option | How the motion behaves | Where it fits |
|---|---|---|
| Linear | Constant speed from start to end | Long, slow moves that run for the whole clip |
| Ease In | Starts slowly, then speeds up | Moves that continue into a cut |
| Ease Out | Starts quickly, then slows to a stop | Arriving at a subject and holding |
| Ease In Out | Slow start, slow finish | Most camera-style pan and zoom moves |
| Back | Goes slightly past the target and returns | Playful motion for graphics and stickers |
| Bounce | Rebounds before settling | Titles and icons, not camera moves |
| Elastic | Springs around the target before settling | Energetic graphic elements |
For a pan and zoom across a photo or clip, Linear, Ease Out, and Ease In Out are the practical choices. Back, Bounce, and Elastic make the whole picture wobble, which is rarely what you want from a camera move.
Avoiding excessive movement
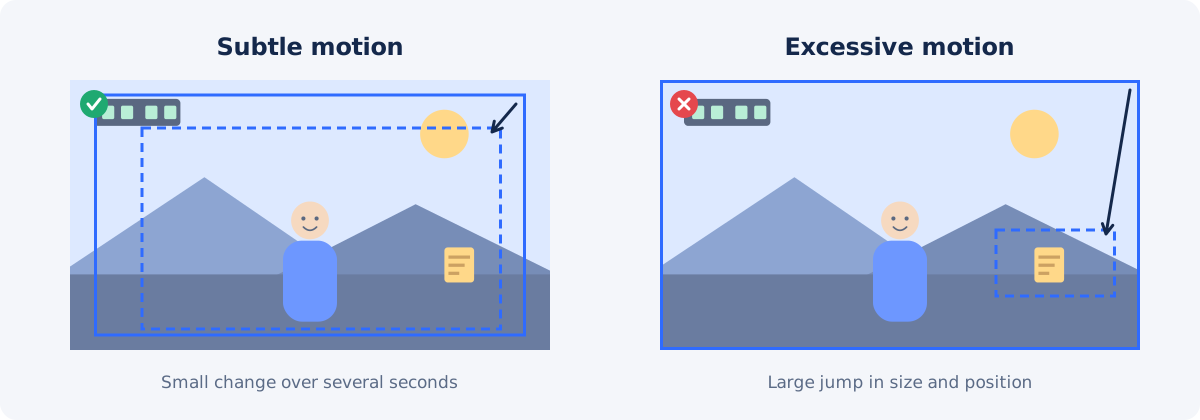
The effect works when viewers feel it more than they notice it. Large, fast, or frequent moves pull attention away from the content and can be uncomfortable to watch on a big screen.
- Keep the change modest. A zoom difference of 10–30% between keyframes is enough for most photos.
- Move in one direction per shot. Avoid zooming in and then immediately back out.
- Do not animate every image the same way. Alternate zoom in, zoom out, and pans, and leave some shots still.
- Hold on text. If the viewer needs to read, stop the motion or make it very slow.
- Stay within the resolution of the source. A strong zoom on a small image turns soft at the end of the move, exactly where the viewer is looking.
Step-by-step: pan and zoom in the Deus.Video editor
The steps below use a photo. Keyframes work the same way for video clips and other elements on the timeline.
- Open the editor and add your photo or clip. Select it on the timeline. The edit panel opens on the left. For a photo it is titled Edit Image.
- Set the duration. Use the Start and End fields at the top of the panel to define how long the element stays on screen, for example 0:00 to 0:05.
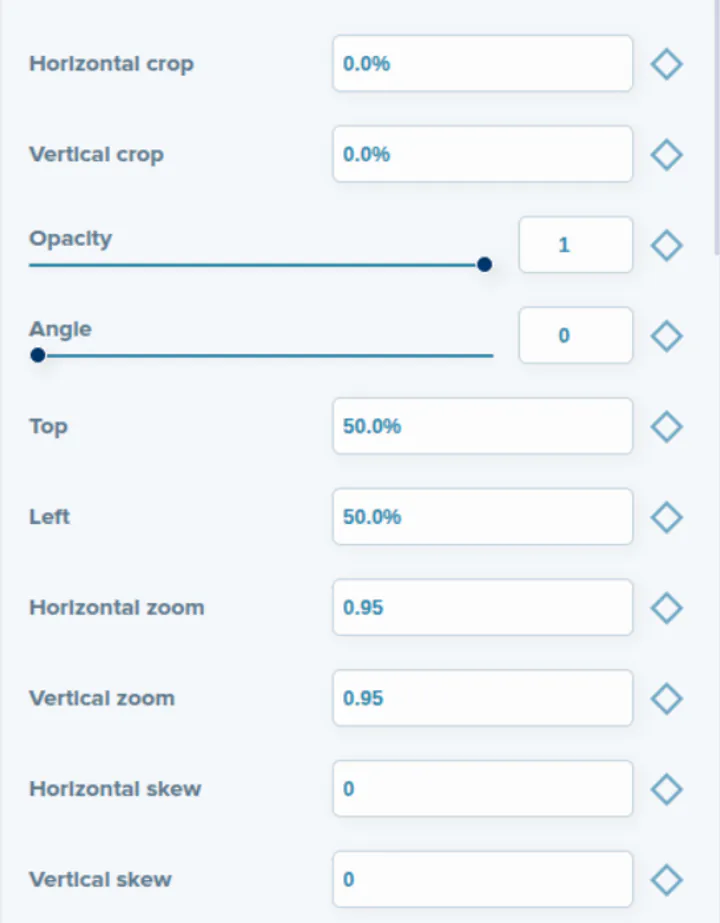
- Set the start framing. Move the playhead to the beginning of the element. Adjust Horizontal zoom and Vertical zoom to the size you want, and use Top and Left to position the picture. Position is measured from the center, so Top 50% and Left 50% place the element in the middle of the canvas. Make sure the picture covers the canvas.
- Add the first keyframes manually. Click the diamond-shaped button to the right of each property you plan to animate. Its tooltip reads "add keyframe." For a pan and zoom, that is normally Horizontal zoom, Vertical zoom, Top, and Left. The diamond becomes filled to show that the property has a keyframe.
- Set the end framing. Move the playhead to the moment the motion should finish and change the values of the same properties. You do not need to click the diamond again: once a property has its first keyframe, changing its value at a different time creates a new keyframe automatically. A counter such as "2 KF" appears next to the property.
- Fine-tune a keyframe. Click the KF counter to expand the small keyframe timeline under the property. Select a keyframe to see the Selected keyframe section, where you can edit its Time and Value precisely.
- Choose the easing. With the first keyframe selected, open "Easing to next keyframe" and pick an option such as Ease In Out. Use the same easing for every property in the move.
- Preview. Play the section from the beginning and watch the edges of the canvas and the final frame.
- Export. When the motion looks right, click Download video.
Understand the zoom values
The zoom fields hold a scale factor for the element, and 1 is not always the starting point. When you add a photo that is larger than the canvas, the editor scales it down proportionally to fit, so the initial value may be something like 0.95. Treat the value you see after adding the element as your baseline, and raise it from there to zoom in.
Keep horizontal and vertical zoom in step
Horizontal zoom and Vertical zoom are separate properties. For a natural zoom, give both the same value at every keyframe, and place their keyframes at the same times. If only one of them changes, the picture is stretched in one direction during the move.
Keep all properties synchronized
A combined move animates up to four properties. Change all of them while the playhead stays at the same position, so their automatic keyframes land at the same time, and use the same easing for each. If the zoom uses Ease In Out while the position uses Linear, the view drifts off its path in the middle of the move.
Want to try it on your own photo or clip? Open the Deus.Video editor, add two keyframes to the zoom and position properties, and preview the motion before you export.
Where the effect works well
Photos
This is the original use. A slow zoom toward a face, or a pan across a group, gives a still image a sense of time. Use high-resolution photos and vary the direction from one image to the next.
Presentations
Slides exported as images can be animated to guide the eye: start on the full slide, then move toward the chart or figure being discussed. Keep the motion short and hold on the end frame so the content can be read.
Tutorials
In a screen recording, a quick eased zoom toward the menu or field in use shows viewers where to look. Zoom back out when the action moves elsewhere. If the framing can stay fixed for the whole clip, a static zoom is simpler. See how to zoom into one part of a video.
Establishing shots
A wide shot of a location, recorded on a tripod or taken as a photo, gains life from a very slow push in or pull out. Linear easing over the whole clip works well here, because the move has no visible start or stop.
When a simpler tool is enough
If you only need to remove the edges of the frame for the whole clip, animation adds nothing. Crop Video selects the area to keep, and a static zoom gives a closer fixed view.
Conclusion
A pan and zoom effect is two well-chosen frames and a smooth path between them. Decide where the move ends, set keyframes for zoom and position at the start and end, keep horizontal and vertical zoom equal, and use gentle easing. Keep the change small, make sure the picture covers the canvas all the way through, and preview the full move before you export.
Frequently asked questions
What is the difference between the Ken Burns effect and pan and zoom?
They describe the same technique. The name comes from documentary filmmaker Ken Burns, who used slow pans and zooms over still photographs extensively. "Pan and zoom" is the neutral term, and it applies to video clips as well as photos.
How many keyframes do I need?
Two per animated property: one at the start of the move and one at the end. You add the first one with the diamond button, and the editor creates the rest when you change the value at another time. Add a third only when the path needs to change direction or pause. More keyframes mean more places where timing can drift out of sync.
Can I create this effect with the standalone Zoom Video tool?
No. That tool applies one zoom level and one position to the complete clip, so the framing never changes. Animated motion requires keyframes, which are available in the full editor.
Why does the picture look stretched during the move?
The horizontal and vertical zoom values are probably different at one of the keyframes, or their keyframes sit at different times. Open both properties, compare the Time and Value of each keyframe, and make them match.
Why does the empty canvas show at the edge during the animation?
At some point in the move, the picture no longer covers the whole canvas. Increase the zoom values, or reduce how far the position changes. Scrub slowly through the move to find the moment where the gap appears.
Sources
- Wikipedia, "Ken Burns effect" – panning and zooming over still images and the origin of the name: https://en.wikipedia.org/wiki/Ken_Burns_effect
- Deus.Video editor interface – property names, "add keyframe" button, automatic keyframes after the first one, center-based positioning, Selected keyframe fields, and easing options, based on production screenshots and details provided by the Deus.Video team (September 18, 2026)
- Deus.Video, Zoom Video tool page – static zoom behavior of the standalone tool: https://deus.video/zoom-video/ (checked September 18, 2026)
- Wikipedia, "Digital zoom" – enlargement adds no resolution: https://en.wikipedia.org/wiki/Digital_zoom


