What happens technically when a video is zoomed
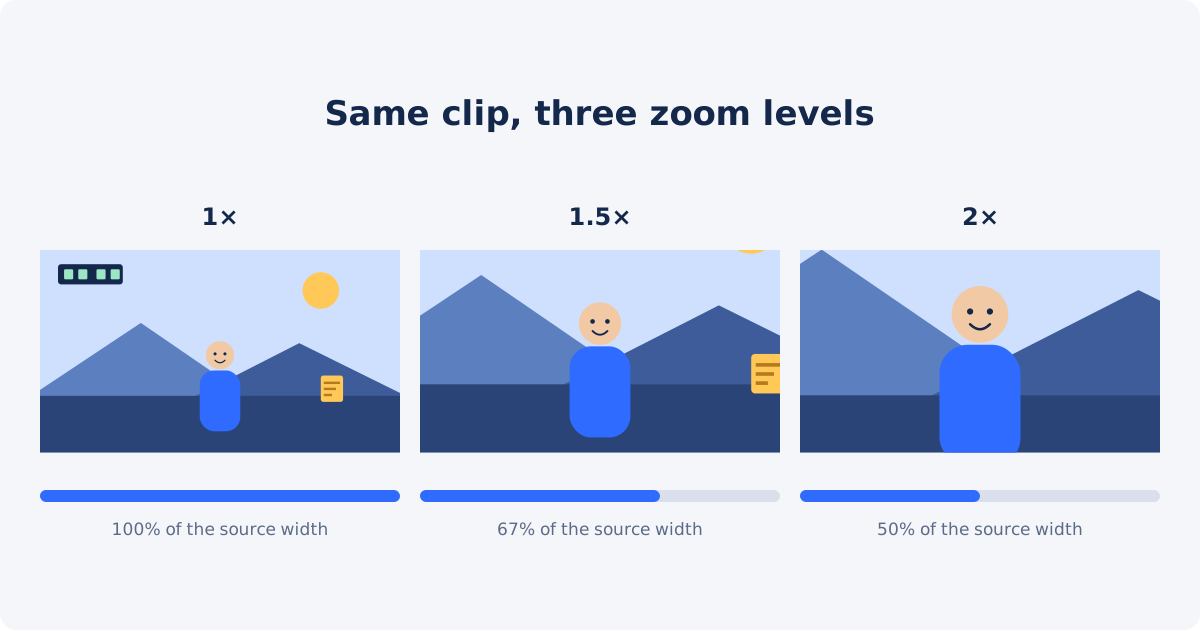
A video frame is a grid of pixels, for example 1920 across and 1080 down. When you zoom in during editing, the editor selects a smaller rectangle inside that grid and scales it up until it fills the whole output frame. The frame size stays the same. The picture inside it gets bigger.
This is called digital zoom. It is a crop followed by an enlargement. Everything outside the selected rectangle is discarded, and everything inside it is spread across more pixels than it originally had.
To fill the extra pixels, the software estimates new values from the neighboring ones. This step is called interpolation. It produces a smooth result, but the new pixels are calculated guesses, not recorded detail.
Why strong zoom looks softer
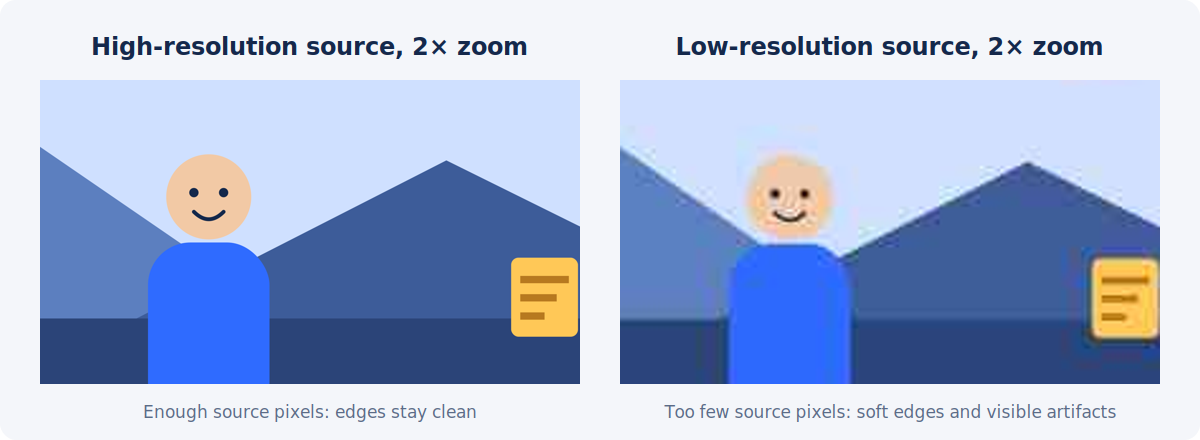
At 2× zoom, every source pixel has to cover the area of four output pixels. At 4×, it covers sixteen. Fine structures such as eyelashes, fabric texture, or thin letters were recorded with only a few pixels, and stretching those few pixels makes edges look blurred.
Compression adds to the effect. Most video files are compressed in small blocks, and the compression leaves faint artifacts, which are small errors such as blockiness or ringing around edges. At normal size they are hard to see. Enlarged two or three times, they become visible, especially in dark areas and around text.
Source resolution versus output resolution
Source resolution is the pixel size of the file you upload. Output resolution is the pixel size of the video you export or that viewers finally watch. The relationship between the two decides how much zoom you can afford.
If the source has more pixels than the output needs, there is spare detail to zoom into. If the source and the output are the same size, any zoom above 1× means enlargement. If the source is smaller than the output, the picture is already being enlarged before you zoom at all.
When you zoom in on a video online with Deus.Video, the tool keeps the output frame in place and enlarges the picture inside it. That is why the quality of the uploaded file matters so much.
Optical zoom during recording versus digital zoom in editing
Optical zoom happens in the camera lens before the image reaches the sensor. The lens magnifies the scene, and the sensor records the closer view at its full resolution. No pixels are thrown away.
Digital zoom in editing works on a picture that has already been recorded and compressed. It can only rearrange the pixels that exist. For that reason, a shot recorded closer, or with optical zoom, will normally look cleaner than the same framing created later by enlarging a wide shot.
How zoom factor affects the retained source area
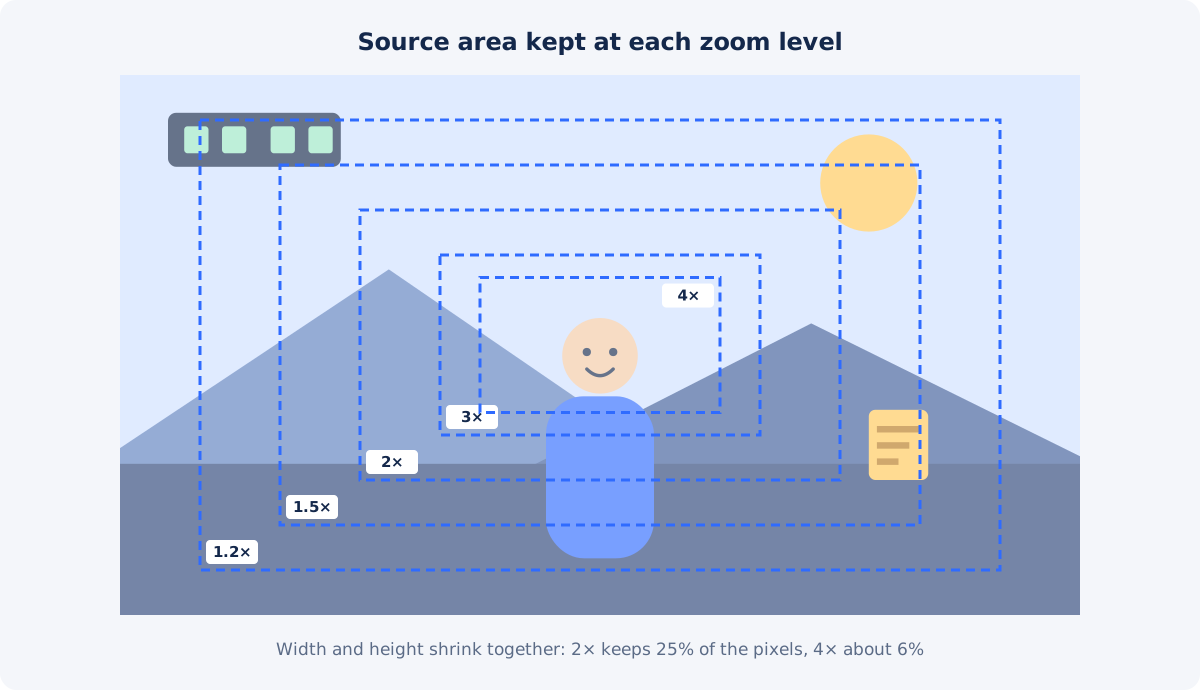
The zoom factor tells you how much of the source survives. At 2×, the visible area is half the source width and half the source height. Both dimensions shrink together, so the retained pixel area falls faster than the width alone suggests: half the width and half the height is a quarter of the pixels.
| Zoom level | Approximate source width retained | Expected visual effect | Recommended use |
|---|---|---|---|
| 1× | 100% | Original framing | No enlargement |
| 1.2× | About 83% | Mild reframing | Small composition correction |
| 1.5× | About 67% | Noticeable close-up | Focus on a nearby subject |
| 2× | 50% | Strong enlargement | High-resolution source and clear detail |
| 3× | About 33% | Significant softness risk | Exceptional cases only |
| 4× | 25% | Very strong enlargement | Usually avoid unless the source is oversized |
In terms of pixel area, 1.2× keeps about 69% of the source, 1.5× about 44%, 2× keeps 25%, 3× about 11%, and 4× about 6%. A 1920 × 1080 frame zoomed to 4× is built from a 480 × 270 region, which is less than many old phone videos.
How to choose a safe zoom level
A simple estimate helps. Divide the source width by the width of the final video. The result is roughly the zoom you can apply before the picture is enlarged beyond its recorded detail.
- 3840-pixel source, 1920-pixel final video: 3840 ÷ 1920 = 2. Up to about 2× still uses real recorded pixels.
- 1920-pixel source, 1920-pixel final video: the result is 1. Any zoom is enlargement, so stay moderate.
- 1280-pixel source, 1920-pixel final video: the result is below 1. The picture is already enlarged, and extra zoom will show quickly.
Treat this as a guide, not a guarantee. A sharp, well-lit, lightly compressed clip tolerates more zoom than a dark, noisy, or heavily compressed one with the same resolution. Content matters too. Faces and landscapes forgive some softness. Small text does not.
In practice, use the lowest value that solves the framing problem. If 1.3× makes the subject clear enough, do not go to 1.8× just to fill the frame more tightly.
Why starting from the original file matters
Copies of a video are rarely equal. Files sent through messengers, downloaded from social platforms, or exported as small previews are usually reduced in resolution and compressed harder than the camera original. They look acceptable at normal size and fall apart when enlarged.
Before you zoom, find the earliest version of the clip you can get: the file from the camera or phone, the original screen recording, or the full-size export from your editor. It gives the zoom more real detail to work with.
How repeated exports affect quality
Most video formats use lossy compression, which means each export discards a little information to keep the file small. Exporting a file that was already compressed, then editing and exporting it again, stacks these losses. The effect is known as generation loss.
Zooming makes generation loss easier to see, because it enlarges the artifacts along with the picture. Plan your edits so the video is exported as few times as possible. If you need to trim, zoom, and add text, do it in one editing session when you can, not as three separate downloads and uploads.
Step-by-step: zooming in Deus.Video
The standalone Zoom Video tool applies one zoom level and one position to the complete clip. The supported range is 1× to 4×, where 1× is the original framing. The zoom and position you select stay fixed from the first frame to the last.
- Upload the original file. MP4, MOV, AVI, WebM, and MKV are supported.
- Set the zoom level. Start with a moderate value such as 1.2× or 1.5×, using a preset or the zoom level control.
- Choose the visible area. Drag the video in the preview, or use the horizontal and vertical position fields for precise placement. The Center video button resets the position.
- Preview the complete clip. Play it through and watch the subject and the frame edges.
- Lower the zoom if the picture looks soft. Small reductions, such as 1.8× to 1.5×, often make a visible difference.
- Apply the zoom. The video is processed with the selected level and position.
- Download the result or continue editing. You can open the clip in the full editor if it needs more work.
Need a closer view of a subject that was recorded too far away? Try the Zoom Video tool: set a level from 1× to 4×, drag the video into position, and preview the clip before you export.
How to inspect the result before downloading
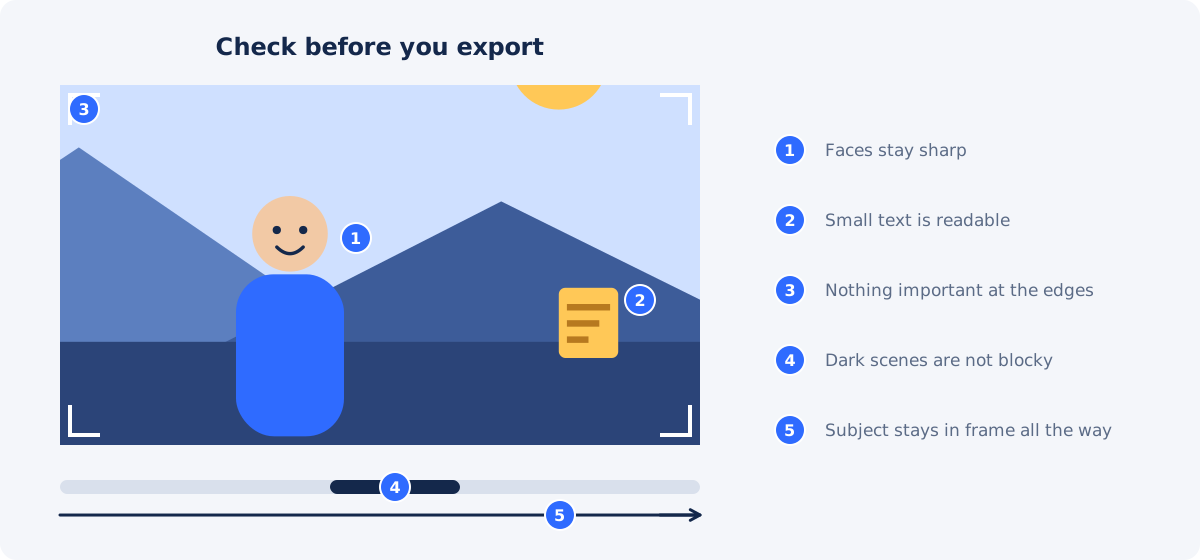
The preview exists so you can catch problems while they are still cheap to fix. View it at the size your audience will use. A clip that looks fine in a small preview window can look soft in full screen.
- Faces. Check eyes and hair. If they look smeared, the zoom is too strong for this source.
- Small text. Pause on labels, captions, or interface text and try to read them.
- Frame edges. Make sure nothing important touches or crosses the border of the frame.
- Dark scenes. Shadows reveal blocky compression artifacts first.
- The whole timeline. The position is fixed, so confirm the subject stays inside the frame until the end.
Practical scenarios
4K source for a 1080p final video
This is the comfortable case. A 3840 × 2160 recording has four times the pixels of a 1080p frame. If the final video is delivered at 1080p, a zoom of up to about 2× still draws on recorded detail. Many creators record in 4K for exactly this flexibility.
1080p source for a 1080p output
There is no spare resolution, so every step above 1× is enlargement. Values around 1.2× to 1.5× are usually acceptable for people and general scenes. Check the preview carefully beyond that.
Small product detail
A logo, a stitch pattern, or a connector port often needs 2× or more to fill the frame, and these are exactly the details that show softness. If the detail is the point of the video, a new close-up recording will look better than a strong zoom.
Distant speaker
A presenter filmed from the back of a room benefits from a moderate zoom of 1.3× to 1.8×. Faces tolerate mild softness. Keep some space above the head and make sure gestures do not leave the frame.
Low-resolution downloaded clip
A 480p or 720p file that has already been compressed by a platform has very little headroom. Stay near 1.2×, or accept the original framing. Strong zoom here mostly enlarges artifacts.
Screen recording with small interface text
Text has hard, thin edges, so blur is obvious. Record the screen at a high resolution if you expect to zoom later, and keep the zoom moderate. If the text is still unreadable, record again with the application window enlarged or the interface scaled up.
When crop or re-recording is a better solution
Crop is the better choice when you do not need the frame to stay the same size. Crop Video removes the outer parts and keeps the remaining pixels at their original scale, so nothing is enlarged at that stage. The video gets smaller dimensions. Players may still scale it up on a large screen, but you avoid adding an enlargement step of your own. Our comparison of crop, resize, zoom, and black bar removal explains the difference in more detail.
Re-recording is the better choice when the needed zoom goes beyond what the source can support, when small text must be readable, or when the subject moves so much that a fixed frame cannot follow it. Moving the camera closer, using optical zoom, or recording at a higher resolution solves the problem at the source.
Conclusion
Zooming in cannot add detail, but it does not have to look bad. Start from the original file, compare the source resolution with the final size, and choose the lowest zoom that fixes the framing. Keep exports to a minimum, inspect faces, text, and dark areas in the preview, and switch to cropping or a new recording when the required zoom is more than the source can carry.
Frequently asked questions
Is it possible to zoom in with no quality loss at all?
Only when the source has more resolution than the final video needs. Zooming a 4K recording to 2× for a 1080p result still uses recorded pixels. In every other case some enlargement takes place, and the aim is to keep it too small to notice.
Does a higher-resolution export make a zoomed video sharper?
No. Exporting at a larger size adds more interpolated pixels, not more detail. Sharpness depends on how many source pixels cover the visible area, which is set by the source file and the zoom level.
Is zooming in the camera app better than zooming later?
Optical zoom in the camera is better, because the lens does the magnifying. Digital zoom in a camera app is similar to zooming in editing, although it is applied before the file is compressed, which can help slightly. Recording wide at a high resolution and zooming later keeps your options open.
Can sharpening fix a soft zoomed video?
Sharpening increases edge contrast, which can make a mildly soft picture look crisper. It cannot restore missing detail, and it also emphasizes noise and compression artifacts. Use it lightly, if at all.
Sources
- Wikipedia, "Digital zoom" – digital zoom is a crop scaled up to the original dimensions, with no gain in optical resolution: https://en.wikipedia.org/wiki/Digital_zoom
- Wikipedia, "Generation loss" – quality loss from repeated lossy re-encoding: https://en.wikipedia.org/wiki/Generation_loss
- Deus.Video, Zoom Video tool page – zoom range, positioning, fixed zoom for the whole clip, supported formats: https://deus.video/zoom-video/ (checked September 18, 2026)


