A video lesson, or video tutorial, shows a learner how to do something and talks them through it at the same time. It can be a two-minute answer to a question your students keep asking, one part of an online course, an onboarding clip for new colleagues, or a walkthrough of a piece of software. The format is forgiving: a clear voice, a screen or a camera, and an edit that removes the waiting matter more than studio light or a fancy intro.
This guide covers the whole process: planning the lesson and writing a short script, recording your screen, camera, or voice, cutting out mistakes and pauses, pointing at the important parts, adding subtitles, and exporting. All screenshots come from one demo project, a 27-second lesson on trimming a video, made from an empty project in the Deus.Video editor. Use it as a pattern for your own topic.
Plan the Lesson Before You Record
Most lessons that are hard to watch were recorded first and thought through later. Ten minutes of planning saves an hour of editing.
- One goal per lesson. Finish the sentence "After this lesson, you can…" with one action: trim a clip, set up a pivot table, tune a guitar string. If the sentence needs "and", you have two lessons.
- Who is watching. A beginner needs every click; a colleague who knows the tool needs only the new part. Decide what the learner already knows and skip it.
- What to show. A screen recording for software and anything on a computer; a camera for hands-on skills, a whiteboard, or a talking-head explanation; slides or screenshots for theory. Many lessons mix them: a short intro on camera, then the screen.
- Length. Shorter than you think. A single skill fits into 1–3 minutes, a course module into 5–10. If a lesson runs longer, split it and link the parts with "In the next lesson…".
- Prepare the material. Close notifications and unrelated tabs, open the files you'll need, use a clean test account, and make the cursor and text large enough to read on a phone.
Write a Short Script
You don't need a full screenplay, but write down what you'll say. A script keeps the voice calm, removes "um, so, let's see", and gives you the subtitle text for free. A structure that works for almost any how-to lesson:
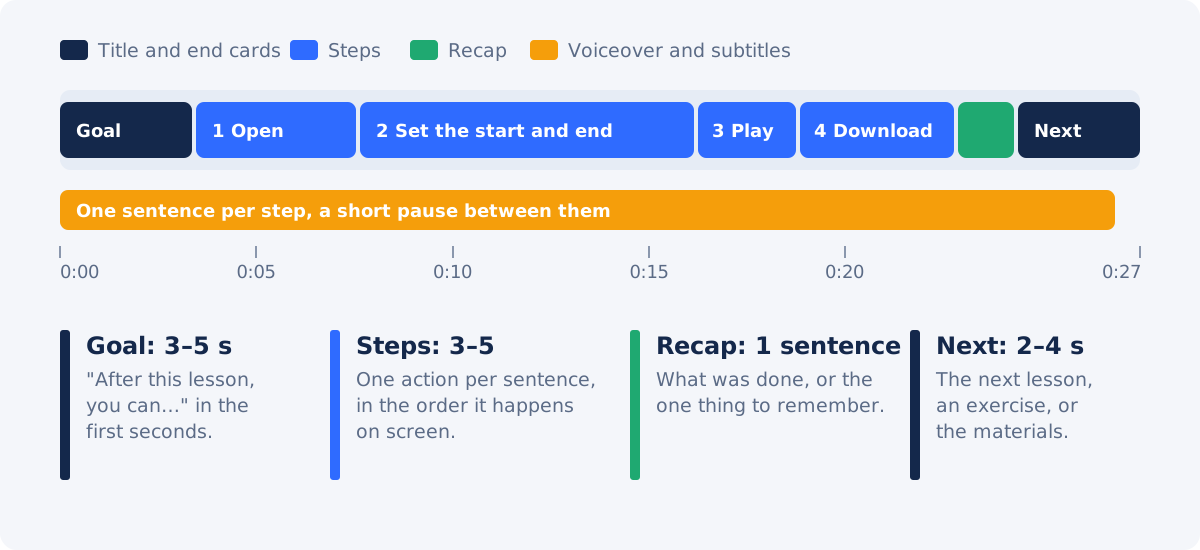
- Goal (3–5 seconds). "In this lesson, you'll trim a video online in four steps." The learner knows what they'll get and how long it takes.
- Steps. One action per sentence, in the order it happens on screen: "First, open the Trim Video tool and click Choose video." Name buttons exactly as they're labeled.
- Recap. One sentence: what was done, or the one thing to remember.
- Next step. The next lesson, an exercise, or a link in the description.
Read the script aloud once with a timer. Spoken text runs at about 130–160 words per minute, so a 150-word script is roughly a one-minute lesson. The demo script has 75 words.
How to Make a Video Lesson in Deus.Video
The steps below use the full Deus.Video editor in the browser, with nothing to install, and the same demo project throughout. The demo is a lesson for the Trim Video tool: a screen recording of the tool, a voiceover generated from the script, a highlight and a callout on the trimming fields, subtitles, and title and end cards.
1. Create a Project and Record
Open the editor and create an empty project. For a lesson watched on a computer or YouTube, keep the horizontal 16:9 frame. Set the frame in the Project panel: Size → YouTube (16:9). With Original, the canvas takes the proportions of the first video you add.
An empty project offers three ways to record right away, and the same options are in the Video and Audio panels later:
- Camera records you through the webcam, for an intro, a talking-head lesson, or a hands-on demonstration.
- Screen records a browser tab, a window, or the whole screen. The browser asks what to share. The sound comes from what you share (the tab or system audio), not from the microphone, so record your voice separately.
- Microphone records your voice as an audio track that starts at the playhead.

If you already recorded with another app, such as OBS, QuickTime, the Windows Game Bar, or a phone, upload the file instead. The demo uses an uploaded 54-second recording of the Trim Video tool at 1440×810.
When you record, don't try to get everything right in one take. Do each step slowly, pause for a second before and after each click, and simply repeat a step if it goes wrong. You'll cut the extra parts in step 3.
2. Add Your Voice
A voiceover recorded separately from the screen is easier to control: you can re-record one sentence without redoing the whole screen, and you can cut long waits on screen without cutting your words. Two ways to add it in the editor:
- Record it yourself. In the Audio panel, choose Record, allow the microphone, read the script, and save. The track is placed on the timeline at the playhead. Your own voice works best for courses where learners know you.
- Generate it from text. Audio → Text To Speech: paste the script, pick the language and a voice, click Listen to hear it, and click Add to project. Both Listen and Add to project use credits, one per started 1,000 characters, and the panel shows the cost for your text before you click. It's a quick way to get an even voice for short how-to clips, and changing a sentence later means regenerating the text, not recording again.

If you recorded your voice elsewhere, upload the file in the Audio panel or use the Add Audio to Video tool. For level and noise tips, see how to add a voiceover to a video. If the screen recording carries sound you don't want (notification sounds, keyboard clicks), lower its volume to zero or follow the guide on removing audio from a screen recording.
3. Cut Out Mistakes and Waiting
This is the step that makes a lesson feel professional. Raw recordings are full of moments where nothing happens: the page loads, a file uploads, the mouse looks for a button. The learner doesn't need them.
- Click the timeline ruler where the unwanted part starts, select the video, and click Split. Do the same where it ends.
- Select the piece in the middle and press Delete.
- Drag the next piece to the left until its edge snaps to the previous one, so there's no gap.
- Play the joint and check that the voice describes what is on screen at that moment. If the screen runs ahead of the voice, move the pieces, not the voice.

In the demo, the tool spent 23 seconds processing the video. In the lesson, that wait is a cut: the learner sees "Trim Video" clicked and, right after it, the result ready to download. If the wait itself matters (for example, "this takes a minute, don't close the tab"), keep a second of it and say so in the voiceover. To trim just the start and end of a recording, the Trim Video tool is enough; for cutting a clip from a longer recording, see how to extract a clip from a longer video.
4. Point at What Matters
On a full-screen recording, a learner doesn't always see where to look. A highlight and a short callout at the right moment do the job of a teacher's finger on the board.
- Highlight. In Elements, add a rectangle, set its fill to transparent and give it a colored border. Place it around the button or field you're talking about.
- Callout. In Text, add a short label (three to five words) with a solid background, padding, and rounded corners so it reads on any screen. In the demo, "Or type exact times" appears next to the trimming fields.
- Timing. On the timeline, make the highlight and callout start when the voice mentions the thing and end when it moves on. Two or three seconds is usually enough.
- Screenshots and zoom. To show a detail the recording doesn't capture well, add a screenshot as an image in the Image panel or with Add Image to Video, or scale up the video piece for a few seconds.

Use one highlight color for the whole lesson or course, so learners learn what it means. For more ideas, such as arrows and numbered steps, see how to annotate a video online and how to add screenshots to a tutorial video.
5. Add Subtitles
Many people watch lessons with the sound off, in a second language, or need captions to follow at all. Subtitles also help learners catch exact button names. The Subtitles panel offers three ways to add them:
- Auto Transcribe. Choose the language and the audio to transcribe (here, the voiceover track) and click Generate. The panel shows the cost in credits before you start: one credit per started minute of audio. The speech is split into short cues by sentences and pauses, and when it's done, the panel opens the list of cues.
- Manual Subtitles. Type each cue and set when it starts and ends. Handy for a very short clip, or when you want full control over line breaks.
- Upload Subtitles File. Import an .srt file, for example one made from your script or exported from another tool.

Always review the result. Read every cue while watching, fix misheard words (product names and terms are the usual suspects), and check that each cue appears with its words, not a second earlier or later. The cue list lets you edit the text and timing of each line; clicking a cue moves the playhead to it. In the demo, the transcription heard "type exact times and keep from and keep until": the field names had to be fixed to "in Keep from and Keep until", and "Trim video" to "Trim Video".

Then open Styles and set the font, size, alignment, bold or italic, font color, stroke color, and background. The size is in pixels of a 1080p frame, so 60–70 reads well on a phone and a laptop alike. To change the position, drag the subtitle box on the canvas or type Top and Left as a percentage of the frame. For lessons, a plain sans-serif font on a semi-transparent dark background near the bottom of the frame is the safest choice. Make sure the subtitles don't cover the part of the screen you're explaining; if they do, move them up or move the highlight.

More on subtitles: adding subtitles manually, syncing subtitles with the video, and burned-in subtitles vs closed captions. To add subtitles to a finished video without opening the editor, use the Add Subtitles to Video tool.
6. Add a Title Card and an End Card
A title card tells the learner where they are; an end card tells them where to go next. Both take a minute in the Text panel.
- Title card, 2–4 seconds: the lesson number and the goal, for example "LESSON 1 · Trim a video online". Keep it short: the voiceover starts at the same time.
- End card, 2–4 seconds: the next lesson, the exercise, or where to find the materials, for example "Next: add subtitles".
- The same look in every lesson. Same background color, fonts, and positions make a series feel like a course. Save the first lesson as a pattern and duplicate it for the next.
The demo uses a dark blue background for the whole project, an orange "LESSON 1" with wide letter spacing over a large white title, and a matching end card. For ready-made animated intros and explainer layouts, browse the tutorial and how-to templates: you can use one as the opening and add your recording after it.
7. Preview and Export
Watch the whole lesson once from start to finish, as a learner would, with the sound on and then with the sound off. Check three things: the voice matches the screen at every cut, every highlight appears when it's mentioned, and the subtitles are readable and don't cover anything important.
Click Download video and choose the resolution. 1080p keeps the text in a screen recording sharp, if your plan includes it; lower resolutions blur small interface text. The free plan exports at up to 720p with a watermark. See plans and pricing for the current limits. You don't have to keep the page open while the video exports: if you're signed in, an email tells you when it's ready.

If the file is too large for your course platform or an email, shrink it with Compress Video. To join several lessons into one video, use Merge Videos.
Tips for Lessons People Finish
- Show the result first. A two-second glimpse of what the learner will make is a stronger hook than "Hi, in this video…".
- Talk to one person. "Click Choose video", not "now we will be clicking". Short sentences, active voice, exact button names.
- Move the cursor slowly and on purpose. Circling the mouse while you think distracts; a still cursor that moves straight to the next button teaches.
- Make text readable on a phone. Zoom the browser or app to 125–150% before recording, and use a large cursor.
- Leave a beat after each step. A half-second pause in the voice gives the learner time to see what changed.
- Keep a series consistent. Same intro, same colors, same highlight style, same end card. Number the lessons.
Common Mistakes
| Mistake | What to do instead |
|---|---|
| A long intro about yourself before the lesson starts | State the goal in the first five seconds; put the introduction in the course description |
| Waiting for pages and uploads left in | Split and delete the wait; mention it in one sentence if it matters |
| Voice recorded through the screen recorder with keyboard noise | Record the voice separately with the microphone or generate it from the script |
| Tiny interface text on a 4K screen | Record a smaller window or zoom in, and export at 1080p if your plan includes it |
| Auto subtitles published without review | Read every cue and fix terms, names, and timing |
| Several skills in one long lesson | One goal per lesson; link the parts with "In the next lesson…" |
Video Lesson Checklist
- One goal, stated in the first seconds.
- A short script read aloud and timed.
- Screen, camera, or both recorded; voice recorded separately or generated.
- Mistakes, pauses, and waiting cut out; no gaps between pieces.
- Highlights and callouts on the things the voice talks about.
- Subtitles reviewed and styled, not covering the action.
- Title card and end card that point to the next lesson.
- Exported at 1080p, or the best resolution your plan allows, and watched once from start to finish.
Ready to record your first lesson? Open the Deus.Video editor: everything above runs in the browser, with nothing to install. For a quick start, pick a layout from the tutorial and how-to templates.
Frequently Asked Questions
How do I make a video lesson online?
Plan one goal for the lesson and write a short script. Record your screen, camera, or both in an online editor such as Deus.Video, add your voice by recording it or generating it from the script, cut out mistakes and waiting with Split, highlight the important parts, add and review subtitles, add a title card and an end card, and export at 1080p if your plan includes it.
How long should a video lesson be?
One skill fits into 1–3 minutes, and a course module into 5–10. If a lesson runs longer, split it into parts and link them with "In the next lesson…". Spoken text runs at about 130–160 words per minute, so a script of 150 words makes roughly a one-minute lesson.
Should I record my voice at the same time as the screen?
It's easier to record them separately. A screen recording in the browser takes its sound from the shared tab or system, not from the microphone, and a separate voice track lets you re-record one sentence and cut waiting on screen without cutting your words. Record the voice with the microphone in the Audio panel or generate it from the script with Text To Speech.
How do I add subtitles to a video lesson?
In the Subtitles panel, choose Auto Transcribe to generate cues from the voice (one credit per started minute of audio), Manual Subtitles to type them, or Upload Subtitles File to import an .srt. Review every cue for misheard terms and timing, then set the font, colors, and background in Styles and drag the subtitles where they don't cover the action.
How do I highlight part of the screen in a tutorial?
Add a rectangle from Elements with a transparent fill and a colored border around the button or field, and a short text callout with a solid background next to it. On the timeline, show both only while the voice talks about that part, usually two or three seconds.
What resolution should I export a screen recording lesson in?
1080p, if your plan includes it; the free plan exports up to 720p with a watermark. Interface text in a screen recording is small, and lower resolutions blur it. If the file is too large for your course platform, compress it afterwards instead of exporting at a lower resolution.