Why vertical video often needs reframing
Short-form feeds are watched on upright phones, and 9:16 is the typical full-screen vertical format. Aspect ratio means the shape of the frame, written as width to height, so 9:16 is 9 units wide and 16 units tall.
A lot of footage was never framed for that shape. Webinars, interviews, gameplay, and camera footage are usually 16:9. Even native phone clips are often shot loosely, with the subject small in the middle of a tall frame. On a small screen that people scroll past quickly, a small subject is easy to miss.
Reframing means deciding again what the frame shows: which part of the picture stays, how large the subject is, and where it sits.
Source aspect ratio versus target canvas
The source aspect ratio is the shape of the file you have. The target canvas is the shape of the video you will publish. Every decision in this guide follows from comparing the two.
- Same shape (9:16 source, 9:16 canvas): only the framing inside needs attention. Zoom is the right tool.
- Different shape (16:9 source, 9:16 canvas): the canvas has to change first. That is a resize and crop job, and zoom comes afterward, if at all.
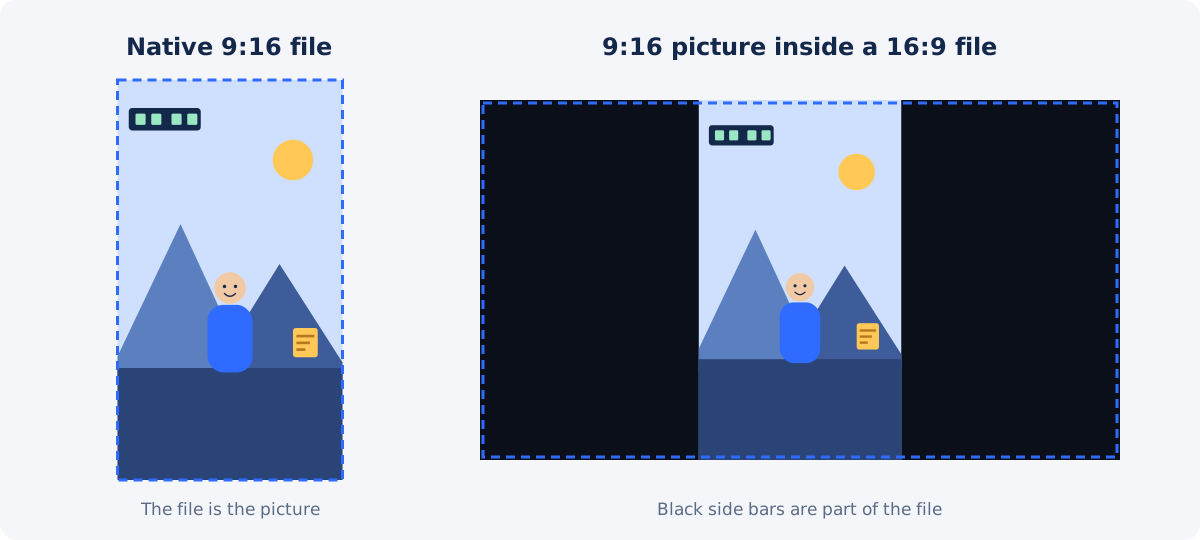
- Misleading shape (a vertical picture stored inside a 16:9 file with black sides): the file's real content is vertical, but the file is not. Clean it before doing anything else.
When zoom is useful
Zoom enlarges the picture inside a frame that stays the same size. It is useful when the canvas is already correct and one of these is true:
- the subject is too far away to read on a phone;
- there is too much empty space above or around the subject;
- a product, a caption, or a detail needs more presence;
- the subject should move away from an area covered by app buttons.
You can use the online video zoomer from Deus.Video for this. It applies one zoom level from 1× to 4× to the complete clip, and you drag the video to choose the visible area. The selected zoom and position stay fixed throughout the output, and you can preview the clip before exporting.
When crop or resize is required instead
Zoom does not change the shape of the frame. If the shape is the problem, use the tools made for it.
- Resize Video sets the output dimensions or canvas, for example a vertical canvas for a horizontal source.
- Crop Video lets you select which part of the picture to keep, including a vertical slice of a horizontal frame.
- Remove Black Bars detects and crops uniform black borders that are saved in the file.
Decision table: where to start
| Source video | First action | Then use zoom? | Recommended approach |
|---|---|---|---|
| Native 9:16 with loose framing | Keep the canvas | Yes | Apply a mild zoom and reposition |
| 16:9 horizontal source | Set a vertical canvas | Sometimes | Crop/reframe, then zoom if needed |
| Vertical image inside a 16:9 file | Remove embedded side bars | Yes | Clean the file before resizing |
| Low-resolution downloaded clip | Inspect quality first | Carefully | Avoid strong enlargement |
| Moving subject | Choose a wider framing | Carefully | Leave room for movement |
| Captions near the bottom | Reposition content | Yes | Keep text away from interface overlays |
Horizontal footage in a vertical frame
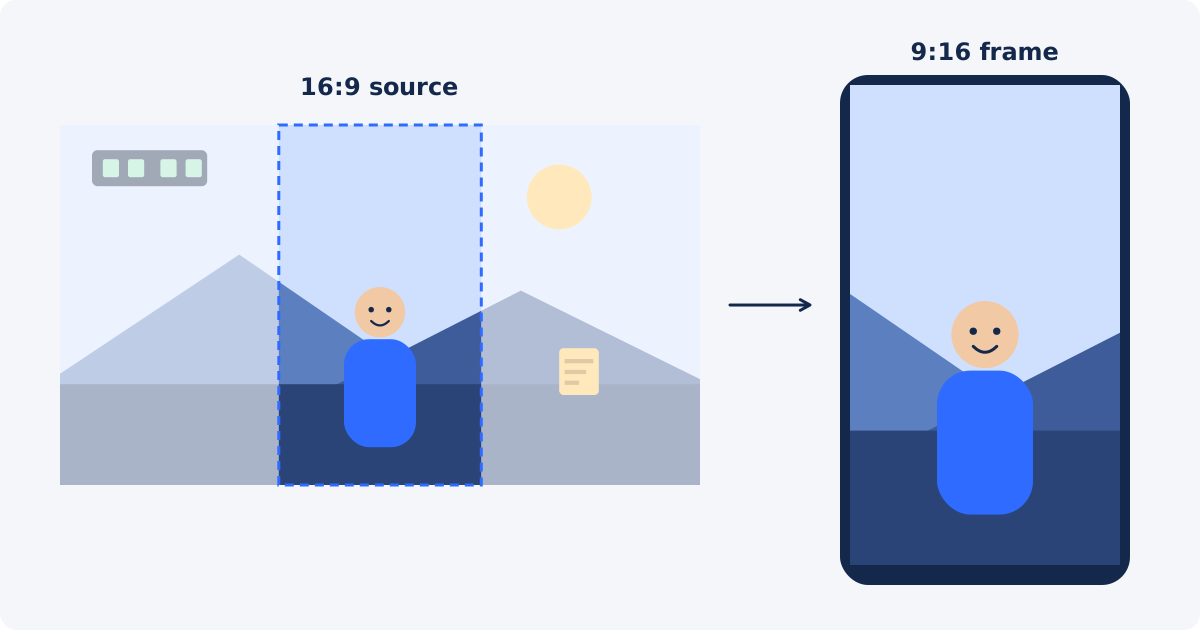
A 9:16 frame cut from a 16:9 picture at full height keeps a little under a third of the width. That is already a strong reframing before any zoom is applied. There are two honest ways to handle it.
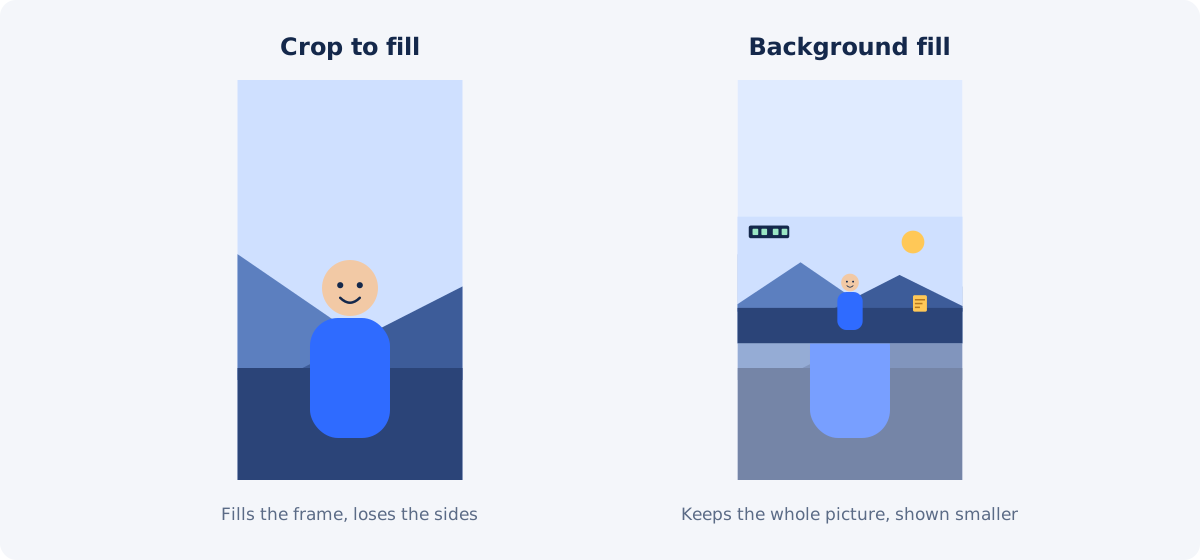
Crop to fill
Choose the vertical slice that contains the subject and discard the rest. The subject becomes large and the frame is full. This suits a single speaker, a product on a table, or a centered game character. It does not suit two people at opposite sides of the frame or wide slides with text.
Background fill
Keep the whole horizontal picture and place it inside the vertical canvas. The space above and below is filled with a blurred copy of the video, a color, or a designed layout with a title and captions. Nothing is lost, but the picture is small.
A middle path is common: place the horizontal picture on the vertical canvas and enlarge it somewhat, so the sides are trimmed a little and the picture takes up more height. It keeps more context than a full crop and gives the subject more size than a plain fit.
Keeping faces, captions and products inside a safe visual area
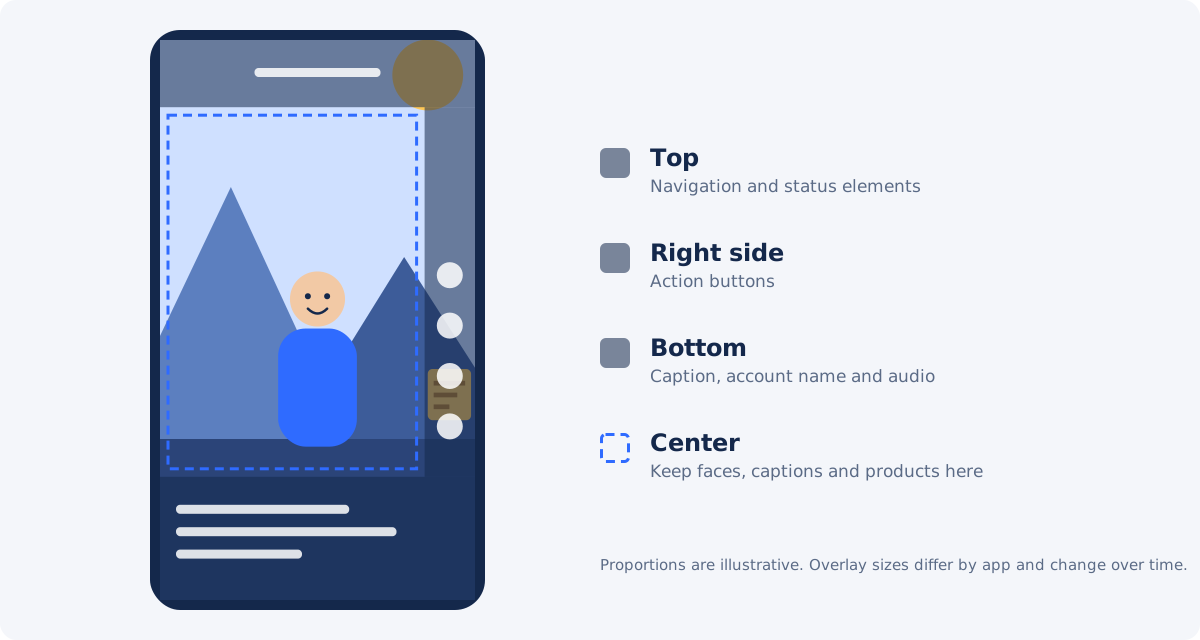
Short-form apps draw their interface on top of the video. Typically there is a column of action buttons on the right, the account name, caption, and audio information at the bottom, and navigation elements at the top. Anything important placed there may be covered.
The exact sizes of these areas differ between apps, change with updates, and can depend on caption length. TikTok's advertising documentation, for example, states that the safe zone depends on the video dimension, the caption length, and any add-ons used. Treat published pixel margins as temporary, and check each platform's current guidance when precision matters.
A practical rule that holds up: keep faces, burned-in captions, product details, and logos in the central part of the frame, leaning slightly above the middle. Zoom and position together are how you get them there. If a caption sits too low, moving the picture up inside the frame lifts it clear of the bottom overlay.
Avoiding excessive enlargement
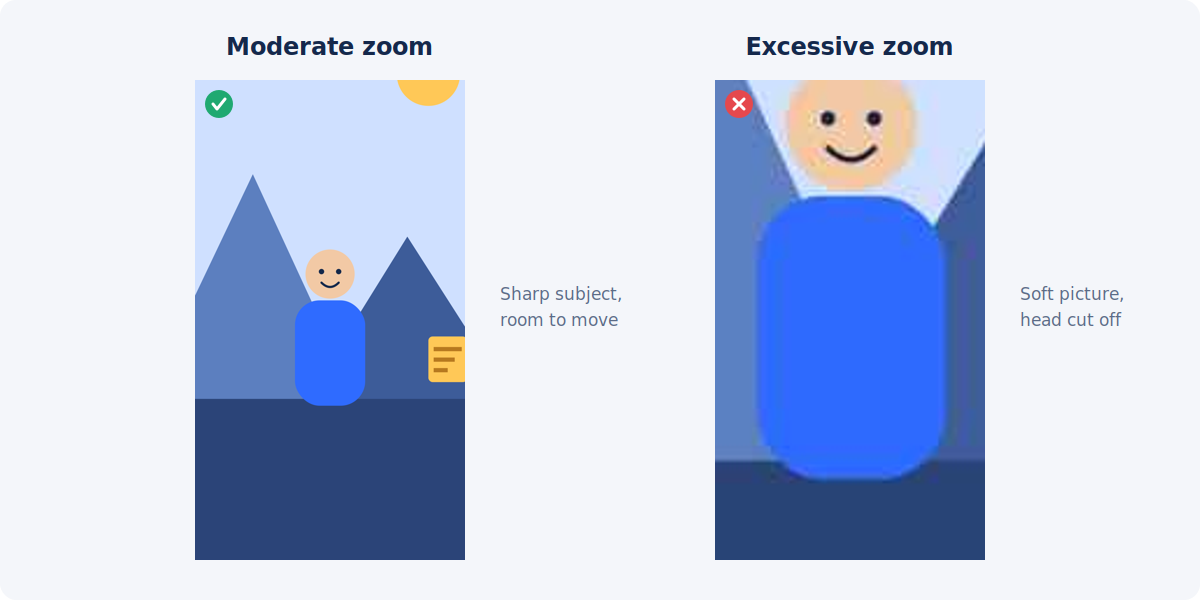
Zooming enlarges a smaller source area across the output frame. At 2×, the visible picture is built from a quarter of the source pixels. Stronger zoom can reduce perceived sharpness, and the platform compresses the video again after upload, which does not help a soft picture.
Horizontal sources deserve extra care. Cropping a 1920 × 1080 frame to a vertical slice leaves roughly 608 × 1080 pixels. Filling a 1080 × 1920 canvas with that slice already means enlarging it by nearly 1.8 times. Adding more zoom on top compounds the enlargement.
Use the lowest zoom that makes the subject clear on a phone. For a fuller explanation of source resolution and safe zoom levels, see our guide on zooming in while minimizing quality loss.
Workflow for a native vertical source
- Upload the original phone clip to the Zoom Video tool, not a copy downloaded back from an app.
- Set a mild zoom, usually between 1.1× and 1.5×.
- Drag the video so the subject's eyes sit near the upper third and captions are above the bottom area.
- Play the complete clip. The position is fixed, so make sure the subject stays in the frame.
- Apply the zoom and download the result, or continue editing.
Workflow for a horizontal source
- Decide between crop to fill and background fill by checking what reaches the left and right edges of the picture.
- Set the vertical canvas with Resize Video, using a vertical preset or custom dimensions.
- Crop or reframe to the area around the subject if you chose to fill the frame.
- Check the result on a phone-sized preview. If the subject is still small, apply a moderate zoom as a last step.
- Review sharpness on faces and text, since this path involves the most enlargement.
Workflow for a video with embedded black bars
Some files look vertical but are not. A vertical clip exported from a horizontal project is a 16:9 file with black sides saved into it. Uploaded to a vertical feed, it shows as a small picture boxed on all sides.
- Confirm the bars are in the file by opening it in a regular player. Bars that appear only inside one app are added by that app, and the file needs no repair.
- Remove the embedded borders with the Remove Black Bars tool. The file becomes vertical again, at a lower resolution than a native recording.
- Resize to your vertical output dimensions if needed.
- Apply a mild zoom only if the framing is still loose, and keep it low because the cleaned file has limited resolution.
Our guide to fixing black bars on vertical videos covers this case in more detail. If you still have the original phone clip, a fresh vertical export from it will give a sharper result than rescuing the bordered file.
Framing too loose for a phone screen? Zoom in on a video online with Deus.Video: choose a level, drag the subject into place, and preview the whole clip before exporting.
Practical scenarios
Talking-head clip shot on a phone. The speaker occupies the middle third of a tall frame, with ceiling above. A 1.3× zoom with the picture moved down slightly brings the face to the upper third and removes the empty ceiling.
Podcast recorded in 16:9 with two hosts. A full vertical crop can hold only one person. Either cut separate vertical clips for each speaker, or use a background fill that keeps both in view.
Product close-up with a caption at the bottom. The caption falls under the app's text area. Reposition the picture upward so the caption clears the bottom, and check that the product is not pushed under the top elements.
Gameplay highlight. The action moves across the whole screen. Choose a wider framing with a mild zoom, or a background fill, so the key moment does not leave the frame.
Clip saved from a messenger. The resolution is low and compression is heavy. Keep the original framing or stay near 1.2×.
A note on platform specifications
Platform requirements change, so this guide avoids exact limits. The points below were checked against official sources on September 18, 2026.
- YouTube Shorts: YouTube Help describes Shorts as videos with a square or vertical aspect ratio, up to three minutes long.
- TikTok: TikTok's in-feed ad specifications list vertical 9:16 as the recommended format and note that the safe zone varies with the video dimension, caption length, and add-ons.
- Instagram Reels: 9:16 is widely used as the full-screen vertical format. We did not locate a current official page with exact Reels specifications, so confirm details in Instagram's Help Center before a final export.
Treat duration, resolution, and safe-area values as changeable, and check the official pages when you prepare important content.
Final preview checklist
- The file is truly vertical, with no black bars saved into it.
- The subject is readable at phone size without being cut by the frame.
- Eyes sit near the upper third, with some headroom.
- Captions, logos, and product details are clear of the top, the bottom, and the right-hand button column.
- The subject stays inside the frame for the entire clip.
- Faces and text still look sharp at the chosen zoom.
- The clip was exported as few times as possible, starting from the original file.
Conclusion
For vertical short-form video, zoom is the finishing step. Get the file and the canvas right first: remove embedded bars, set the vertical shape, and decide between cropping and a background fill. Then use a moderate zoom and careful positioning to make the subject clear and keep it out from under the app interface. Preview the full clip at phone size, and keep enlargement as low as the framing allows.
Frequently asked questions
Can zoom alone turn a horizontal video into a vertical one?
No. Zoom keeps the shape of the frame, so a 16:9 video stays 16:9 at any zoom level. Changing the shape requires a new canvas and a crop or background fill. Zoom can then refine the framing inside the vertical canvas.
How much zoom is reasonable for a phone clip?
For native vertical recordings, 1.1× to 1.5× covers most framing corrections. Go higher only if the source has clearly more resolution than the final video and the preview still looks sharp.
Why does my video look softer after uploading than in the preview?
Platforms compress every upload again. A picture that was already enlarged has less real detail to survive that compression. Starting from the original file and using less zoom gives the platform's encoder a cleaner picture to work with.
Should I add captions before or after zooming?
After. Captions added before a zoom are enlarged and moved together with the picture, and they may end up cut off or soft. Set the framing first, then add text at the final size and position.
The subject moves around a lot. Can the zoom follow them?
The standalone tool keeps one zoom level and one position for the whole clip. Use a wider framing, split the clip into sections with different positions, or continue in the full editor and animate the zoom and position with timeline keyframes.
Do I need different versions for TikTok, Reels, and Shorts?
One 9:16 master usually works for all three. The interface overlays differ, so keep important content in the central area that is clear on each of them. If a caption or logo must sit low in the frame, preview the clip in each app before publishing.
Sources
- YouTube Help, "Upload YouTube Shorts" – up to 3 minutes, square or vertical aspect ratio: https://support.google.com/youtube/answer/12779649?hl=en&co=GENIE.Platform%3DDesktop (checked September 18, 2026)
- YouTube Help, "Understand three-minute YouTube Shorts": https://support.google.com/youtube/answer/15424877?hl=en (checked September 18, 2026)
- TikTok Business Help Center, "TikTok Auction In-Feed Ads" – vertical 9:16 recommended; safe zone depends on dimension, caption length, and additional formats: https://ads.tiktok.com/help/article/tiktok-auction-in-feed-ads?lang=en (checked September 18, 2026)
- Instagram: no current official specification page was located during this check. No Instagram-specific values are stated in this article.
- Deus.Video, Zoom Video tool page – 1×–4× range, fixed zoom and position, preview before export, keyframes in the full editor: https://deus.video/zoom-video/ (checked September 18, 2026)
- Wikipedia, "Digital zoom" – enlargement adds no resolution: https://en.wikipedia.org/wiki/Digital_zoom


