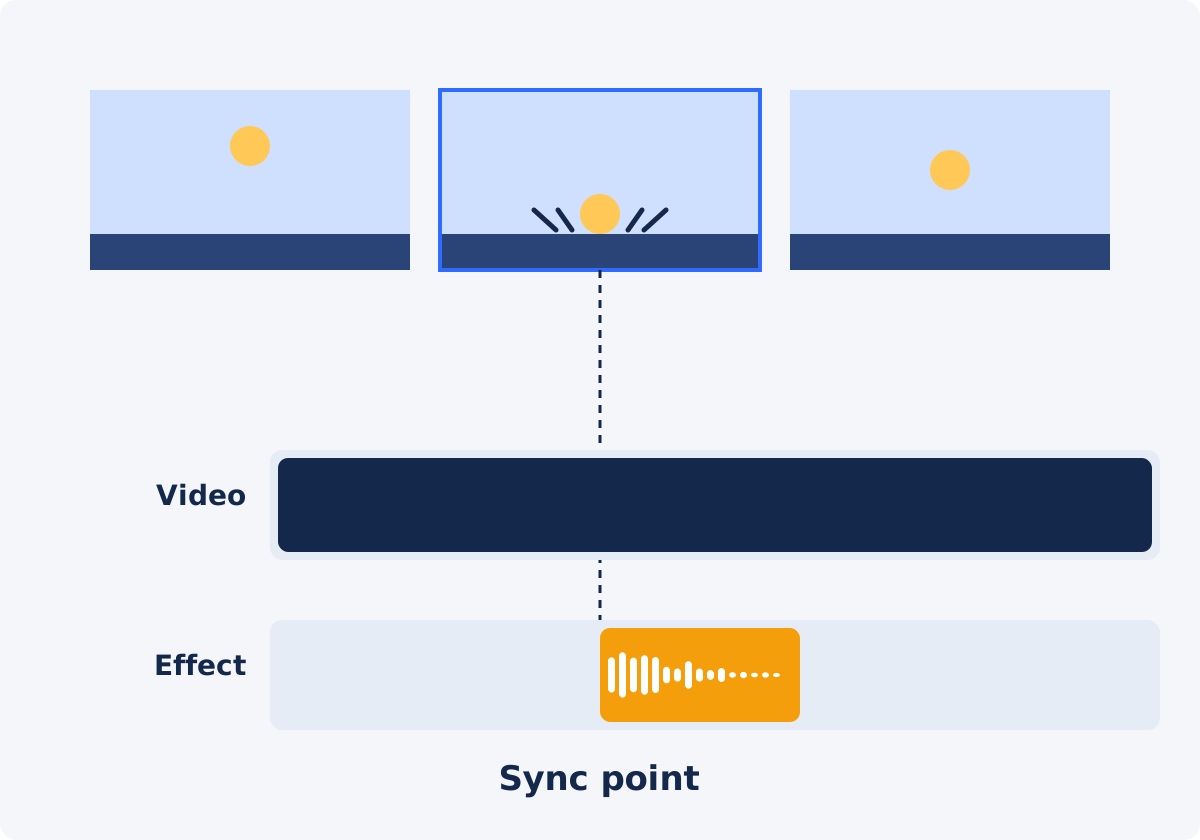
Choose a visible sync point
A sync point is the single frame where the viewer expects to hear something. Pick it before you touch the audio. Step through the video slowly and write down the time.
- Impact. The first frame of contact: a ball touching the ground, a door meeting its frame, a hand hitting a table. Use the contact frame, not the frame where the motion begins.
- Click. The frame where a button changes state or a cursor press registers. In screen recordings, this is often a highlight or a change of color.
- Reveal. The frame where a logo, a title, or a product first becomes fully visible. Rising sounds usually end here. They do not start here.
- Transition. The cut, or the midpoint of a wipe or a fast camera move. A whoosh normally peaks at the midpoint of the move.
Notice that two of these four cases do not align the start of the sound with the event. They align the peak. A whoosh or a riser has to begin before its sync point so that its loudest moment arrives on time.
Video timeline start versus audio source offset
Every uploaded track has two separate timing settings, and sound effects depend on both.
Track start and Track end position the track on the video timeline. They define when the sound is heard in the video. If the impact happens at 0:12.4, that is where the hit needs to be heard.
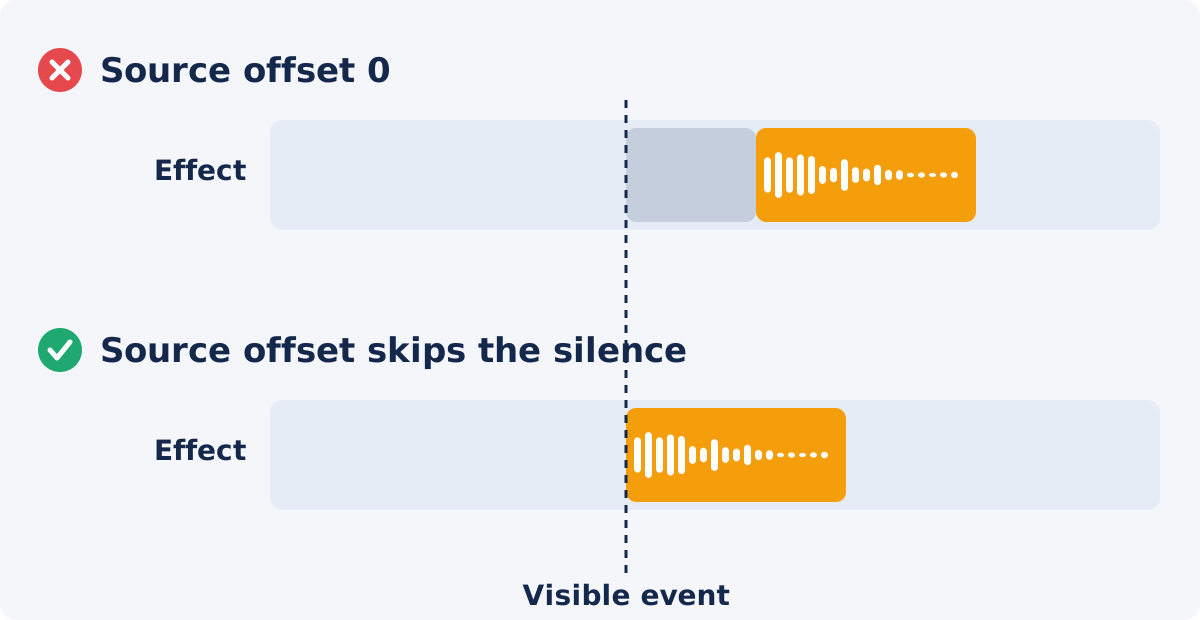
Audio source offset chooses where playback begins inside the audio file. Many downloaded effects contain a short silence before the sound, or a lead-in you do not need. If a file has 0.3 seconds of silence before the hit and you place the track at the impact time with no offset, the hit is heard 0.3 seconds late. Setting the source offset to 0.3 skips the silence, so the hit lands on the frame.
A simple rule: use Track start to say when, and source offset to say from where in the file.
How to add and sync sound effects in Deus.Video
The Add Audio to Video tool lets you place sound effects on a video timeline as individual tracks, alongside music or narration if you need them.
- Upload the video and wait for the upload to finish.
- Add your sound effect files with Add audio files. You can add several. Each one becomes its own track.
- Select one track. The timing, volume, and fade controls apply to the selected track.
- Set Track start to the sync point you noted, or slightly earlier for sounds that build up to a peak.
- Set Track end after the sound has finished, including its tail, which is the natural decay of a sound such as the ring after a bell.
- Set Audio source offset to skip silence or an unwanted lead-in at the beginning of the file.
- Adjust Volume and fade so the effect is clear without jumping out of the mix.
- Preview the moment several times and nudge the timing until it feels right.
- Process, download, and check the same moment in the exported file.

Fine timing: numeric values and the draggable range
You can position a track in two ways. Dragging the track's range on the timeline is quick and works well for rough placement. The numeric Track start and Track end fields are better for the final adjustment, because you can change the value in small steps and keep a record of what you tried.
The fields accept fractions of a second. You can type 12.4, 0:12.4, 1:02.5, or a value with hours such as 0:01:02.5. The interface usually shows two decimal places, which is finer than a single frame at common frame rates.
A practical routine:
- Drag the track near the event.
- Type the sync time from your notes into Track start.
- Preview. If the sound feels late, make Track start a little earlier, or increase the source offset if the file starts with silence.
- If the sound feels early, move Track start later in small steps.
- Stop when you can no longer tell whether it is early or late. That is usually close enough.
Human hearing is more tolerant of sound that arrives slightly after the picture than sound that arrives before it, because in everyday life sound reaches us after light. If you are unsure, err a touch late, not early.
Preview limitations and the final check
The preview plays the video and your audio tracks together so you can judge timing and balance. It reflects each track's position, source offset, and volume. Fades are applied when the video is processed, so you hear them only in the download. The preview is a guide. Playback in a browser depends on the device, its load, and its audio output, so a preview can differ slightly from the encoded file.
Bluetooth headphones and speakers add their own delay, which can be large enough to make a correctly placed effect seem late. When you are timing effects, listen through wired headphones or the device's built-in speakers.
After processing, download the result and watch each sync point in an ordinary video player. If an effect is off in the download, adjust Track start by a small amount, process again, and recheck. Treat the downloaded file as the reference.
Working with several sound effect tracks
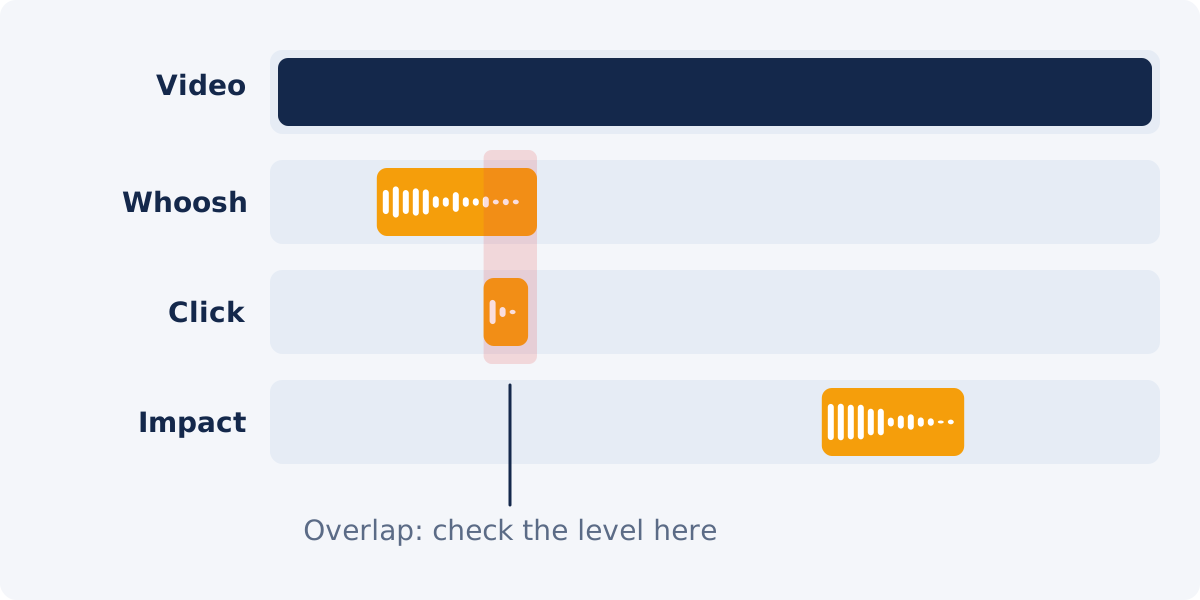
Each effect sits on its own track layer, so a whoosh, a click, and an impact can each have their own timing and level. A few habits keep a multi-track session manageable:
- Name your files before uploading. "door-slam.wav" is easier to find in a list than "audio_014.wav."
- Work in timeline order. Finish the first effect before moving on to the next.
- Keep a list of sync times. A note such as "0:04.2 whoosh, 0:04.8 click, 0:12.4 impact" saves repeated scrubbing.
- Use the same file more than once if needed. Select it again for each moment where it should play. Each copy becomes an independent track with its own start, end, source offset, volume, and fade.
- Delete tracks you do not use. Leftover tracks can add stray sounds to the mix.
Watch for overlaps. Two effects that play at the same time add together and can mask each other or the dialogue. When effects must overlap, lower one of them so a single sound leads.
Volume and fade for sharp sounds
Sharp sounds such as hits, claps, and clicks have a very fast, loud beginning called a transient. Transients sound louder than their average level suggests, and they are the first thing to distort when the mix is too hot. That distortion is clipping, which happens when the combined level of all tracks exceeds what the file can hold.
- Set effect volume in context. Judge it while the music and the original soundtrack are playing, not alone.
- Start lower than you think. An effect should confirm the action. If viewers flinch, it is too loud.
- Be careful with fade in on impacts. A fade is a gradual volume change at the start or end of a track. A fade in softens the transient, which is the part that sells a hit. For impacts and clicks, keep the fade at zero or very short.
- Use fade out on tails. If Track end cuts off a long decay, a short fade out hides the cut.
- Use fades on ambient and rising sounds. Wind, room tone, and risers benefit from a gentle entrance and exit.
The fade setting applies to the selected track, so an impact and an ambience track can use different values. The default is 0, which is what you want for impacts, and the Fade preset sets 1.5 seconds. Check every fade in the processed file, because the preview does not play it.
Sync reference by event type
| Visual event | Audio cue | Timing note |
|---|---|---|
| Object hits a surface | Impact or thud | Align the transient with the first contact frame; skip leading silence with source offset |
| Button press or mouse click | Short click or tap | Align with the frame where the button changes state; keep it quiet |
| Logo or title reveal | Riser followed by a hit or shimmer | Start the riser early so its peak lands on the reveal frame |
| Fast transition or camera move | Whoosh | Center the loudest part on the cut or the midpoint of the move |
| Text or icon pops on screen | Pop or blip | Align with the first frame the element is visible |
| Door closes | Latch click, then slam | Sync to the frame where the door meets the frame, not where it starts moving |
| Footsteps | Individual steps | Align each step with foot contact; slightly uneven timing sounds more natural |
| Scene set in a location | Ambient bed | No precise sync point; start with the scene and use fades |
Common mistakes
Misjudging latency
Wireless audio, a busy computer, or a heavy browser tab can delay what you hear during preview. If every effect seems late by the same amount, suspect the playback chain before you move all your tracks. Check with wired headphones and confirm in the downloaded file.
Wrong source offset
Too little offset leaves silence in front of the sound, so it lands late. Too much offset cuts into the transient, so the effect sounds weak or clipped at the start. If an impact has lost its punch, reduce the offset slightly.
Moving Track start when the problem is inside the file
If you compensate for leading silence by starting the track earlier, the timing may work, but the track range no longer matches what you hear. Setting the source offset keeps the timeline readable: the track begins where the sound begins.
Overlapping effects
Stacking several effects on one moment rarely makes it bigger. It usually makes it blurry and pushes the mix toward clipping. Choose one main sound for each event and keep any supporting layer clearly quieter.
Cutting off the tail
A Track end placed too early chops the natural decay. Extend the range, or add a short fade out.
Using sounds without permission
Sound effects are covered by licenses, as music is. Use effects you recorded, or effects from a library whose license covers your project.
For projects with many effects, cuts between clips, or captions, it is easier to arrange everything in the full Deus.Video editor.
Conclusion
Sync starts with the picture. Find the frame, note the time, and place the effect so its peak lands there. Use Track start for the position in the video and source offset for the position inside the sound file. Set levels in context, keep transients intact, and trust the downloaded file over the preview.
Have your effects ready? You can add audio to a video online with Deus.Video, position each sound on the timeline, and check the mix before you download.
Frequently asked questions
Why does my sound effect play late even though Track start is correct?
The audio file probably begins with a short silence. Increase the audio source offset until playback starts right at the sound. Also check whether you are listening through Bluetooth, which delays what you hear during preview.
How precise is the synchronization?
You can set timing numerically and refine it in small steps, which is enough for typical video work. The browser preview is an approximation, so judge the final timing in the processed download and adjust if needed.
Can I use the same sound effect several times?
Yes. Add the file again for each moment where it should play, and give each copy its own Track start. A single track plays once within its range and is not repeated automatically.
Should sound effects be louder than music?
Usually a little, and only for a moment. An effect needs to be heard over the music at the moment of the action, but it should not startle. Set its level while the music and other tracks are playing.
Can I add sound effects and keep the video's own sound?
Yes. Leave Keep original video audio checked, and the effects are mixed with the existing soundtrack. Uncheck it if you are building a new soundtrack from uploaded files only.
Does the tool place effects automatically on beats or actions?
No. There is no automatic beat or action detection. You choose each position yourself, using the preview, the timeline, and the numeric fields.


