
Remove vs. replace
Removing a background produces a subject with nothing behind it, delivered as a transparent file that an editor can layer over anything. Replacing a background does the same separation and then fills the empty area with a color or an image before the file is saved. The output is a normal opaque video.
The difference is where the decision is made. With replacement, you decide the background now and get a finished clip that plays anywhere. With removal, you decide later, in a program that reads transparency. For most people who simply want their video to look as if it was recorded somewhere else, replacement is the shorter path.
When to choose an image, a color, or transparent
| Goal | Recommended background | Why |
|---|---|---|
| Fast branded clip | Solid brand color | Clean and consistent |
| Realistic new location | Background image | Provides environmental context |
| Further editing | Transparent | Maximum flexibility |
| Chroma-key handoff | Green or blue solid color | Compatible with controlled keying workflow |
A solid color is the safest choice. It never conflicts with the subject's lighting, it hides small edge defects, and it can be matched to a brand palette exactly. An image is the most rewarding choice and the most demanding, because a picture has a perspective, a light source, a color temperature, and a depth of field, and the subject was recorded with its own. Transparent is the choice for editors and for anyone who is not sure yet.

Step-by-step workflow in Deus.Video
Use the tool to replace your video background with Deus.Video in one pass.
- Upload one video. MP4, MOV, AVI, WebM, MKV, and other common formats are accepted.
- Set Output background to Color or Image.
- For Color, pick the color with the color control. Pure green or blue is useful if the file will be keyed in another program.
- For Image, use the Background image file picker to upload a picture. Prepare it with the same aspect ratio as the video, for example a 16:9 image for a 16:9 clip. The image is fitted to the frame, so an image of a different shape will be distorted.
- Click Remove Video Background. Processing runs frame by frame on Deus.Video servers; a progress bar shows how far it is.
- Review the preview at hair, hands, and the fastest movement, and check how the subject sits on the new background.
- Download the MP4, or continue in the full editor to add titles, captions, or other clips.
The subject keeps the source resolution and frame rate, the audio is carried over, and the new background is fixed into the file. If you want a different background later, you process the original video again with a new choice.

How to choose a background image
The right image is one that could plausibly have been behind the subject when the recording was made. Four things decide that.
Perspective
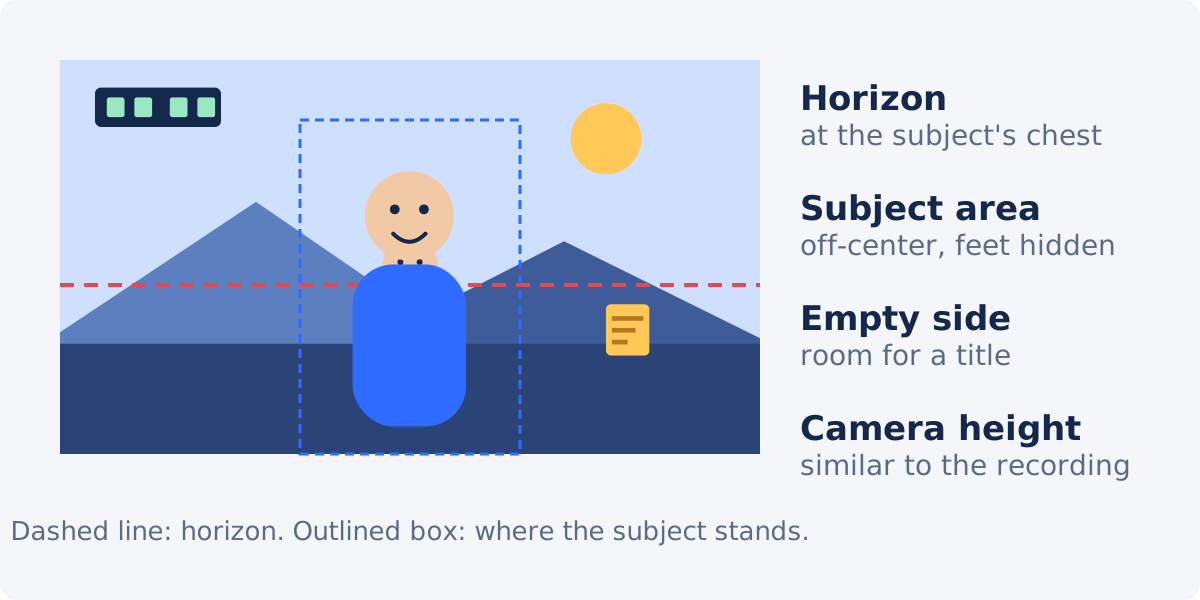
Match the camera height and the angle. A person recorded at eye level looks wrong over a room photographed from above or from floor level. The horizon of the image, or its main horizontal lines, should sit at roughly the subject's chest or shoulder height when the camera was level with the face. Wide-angle room photos with strongly converging walls are hard to match; a plainer, flatter image is easier.
Lighting
Look at where the light comes from in the recording. If the subject's face is lit from the left, the image should show a scene lit from the left too, or at least no obvious light source on the right. A subject with soft, even light sits best over a scene with soft, even light. A subject lit by a single lamp over a bright sunny scene looks pasted on.
Color temperature
Indoor light is often warm, and daylight is often cool. A warm-lit subject over a blue daylight scene, or a cool-lit subject over a golden sunset, reads as two different photographs. Pick images with a similar warmth, or a neutral one.
Depth
Real backgrounds behind a person are usually a little out of focus, because the camera focused on the face. A sharp, detailed image at the same focus as the subject flattens the picture. A gently blurred image, or one with less detail than the subject, restores the sense of depth and also hides edge imperfections.

How to avoid the "sticker" effect
The sticker effect is what happens when the subject looks like a cutout placed on a postcard. Beyond the four points above, a few habits help.
- Give the subject somewhere to stand. Frame the recording so the bottom of the picture cuts the subject at the waist or chest. Full-body cutouts need a floor that matches, which is hard.
- Keep the scale plausible. A person should be as large in the frame as they would be if they were really standing in that room. An image of a huge hall with a giant person in front looks wrong.
- Prefer simpler images. Busy scenes compete with the subject and reveal every edge. Interiors with plain walls, soft gradients, and abstract backdrops are forgiving.
- Avoid images with people or text at the subject's depth. They compete for attention and create odd overlaps.
- Test the edges on a solid color first. If the cutout shows a halo, choose an image whose tone near the subject resembles the original background, which hides it.
- Leave room for graphics. If a title or logo will be added, place the subject off-center and pick an image with a quiet side.
Branding and marketing scenarios
Talking-head presenter
Record in a lit room against a plain wall, a meter or more away from it. Replace with a brand color for consistency across a series, or with a clean, slightly blurred office or studio image for a more polished look. Keep the same background across all videos in a campaign, so the series looks like one production.
Product promotion
Products separate best when they are matte and rest on a plain surface. Replace with a brand color for catalog-style clips, or with a subtle gradient. If you use an image, choose one with a surface at the same height as the one the product stood on, or frame the shot so the base of the product is out of view.
Branded social clip
Solid color output is the natural choice: it is quick, it survives platform compression well, and it makes the clip immediately recognizable. Vertical footage works like any other. If a social post needs a different shape from the recording, cut or resize the finished video afterward with the Deus.Video Resize Video tool.
Presentation and course scenarios
Online course instructor
A neutral color or a calm, blurred study or classroom image keeps attention on the lesson. If slides will appear next to the instructor, a color that matches the slide template is the least distracting option. When the instructor should sit on top of the slides themselves, use the transparent output and build the layout in an editor instead.
Webinar speaker
Webinar recordings are often long and lit by a monitor and a window, which is the difficult end of the scale. Before replacing the background, review the clip for moments where the speaker turns, leans out of frame, or holds something up. A solid color hides more of those moments than an image. If the recording came through a meeting platform, expect heavier compression and softer edges than from a phone or camera.
Social media workflow
- Record vertical or horizontal as the platform needs, on a stable phone, with the subject lit from the front.
- Trim the clip to the section you will use before processing, so the tool works on fewer frames.
- Choose Color for speed and consistency, or Image for a location, prepared in the same aspect ratio as the clip.
- Process, and check the result at phone size, where small edge defects are rarely visible but a wrong background color is very visible.
- Add captions, titles, or music in the full editor if needed, then export once.
Common mistakes
- A background image in the wrong shape. A square image behind a widescreen clip is fitted to the frame and ends up stretched. Crop it to the video's aspect ratio first.
- A sharp, detailed image behind a subject. It flattens the picture and shows every edge. Blur it slightly, or choose something simpler.
- Mismatched light direction or warmth. The most common reason a replacement looks fake.
- Judging on a paused frame only. Watch the clip in motion, since flicker at the edges appears only during playback.
- Re-processing a processed file. To change the background, go back to the original recording.
- Expecting the replacement to fix the recording. The subject's resolution, sharpness, and lighting are what they were.
- Ignoring the audio. The original soundtrack is kept. If the original room was noisy, the new "location" will still sound like the old one.
Inside the full Deus.Video editor, the same separation is available through a Remove background button on any video or image element, which lets you place the cutout over other clips, colors, or images on the canvas and adjust the layout before exporting.
Conclusion
Replacing a background is removal plus a decision. A solid color is quick, consistent, and forgiving. An image can move the subject somewhere else convincingly, provided its perspective, light, warmth, and depth agree with the recording. Transparent leaves the choice to an editor. Prepare the image in the clip's aspect ratio, check the edges on a plain color first, and watch the result in motion.
Ready to try a new scene behind your footage? Remove and replace the background online, start with a solid color to check the cutout, then upload the image that matches your light.
Frequently asked questions
Can I change the background color or image after exporting?
Not directly. The color or image is fixed into the exported video. To change it, process the original recording again with the new choice, or export a transparent result and set the background in an editor.
What size should the background image be?
Use the same aspect ratio as the video, and a resolution at least as large as the video frame, for example 1920 × 1080 for a 1080p clip. The image is fitted to the frame, so a different shape will be distorted, and a small image will look soft.
Can I use a video as the new background?
Not in the standalone tool, which accepts a still image or a color. To place the subject over moving footage, use the Transparent output and layer it over the other clip in the full editor.
Why does the subject look pasted onto the image?
Usually because the lighting, color temperature, perspective, or focus of the image does not match the recording. Choose an image lit from the same side with similar warmth, at a similar camera height, and slightly out of focus.
Which output should I use for chroma keying in another program?
Solid color, set to green or blue. The background is filled with the pure color you choose, which a chroma-key effect can then remove in a program that cannot import transparent video.
Does the replacement change the subject's quality?
No. The subject keeps the source resolution and frame rate. The tool does not sharpen or enhance it, and it cannot fix an unsharp or badly lit recording.
Sources
- Deus.Video, "Remove Background from Video Online" tool page: https://deus.video/remove-video-background/ (accessed September 22, 2026)
- Wikipedia, "Chroma key," for the keying workflow behind the green or blue solid-color handoff: https://en.wikipedia.org/wiki/Chroma_key (accessed September 22, 2026)
- Wikipedia, "Color temperature," for warm and cool light: https://en.wikipedia.org/wiki/Color_temperature (accessed September 22, 2026)


