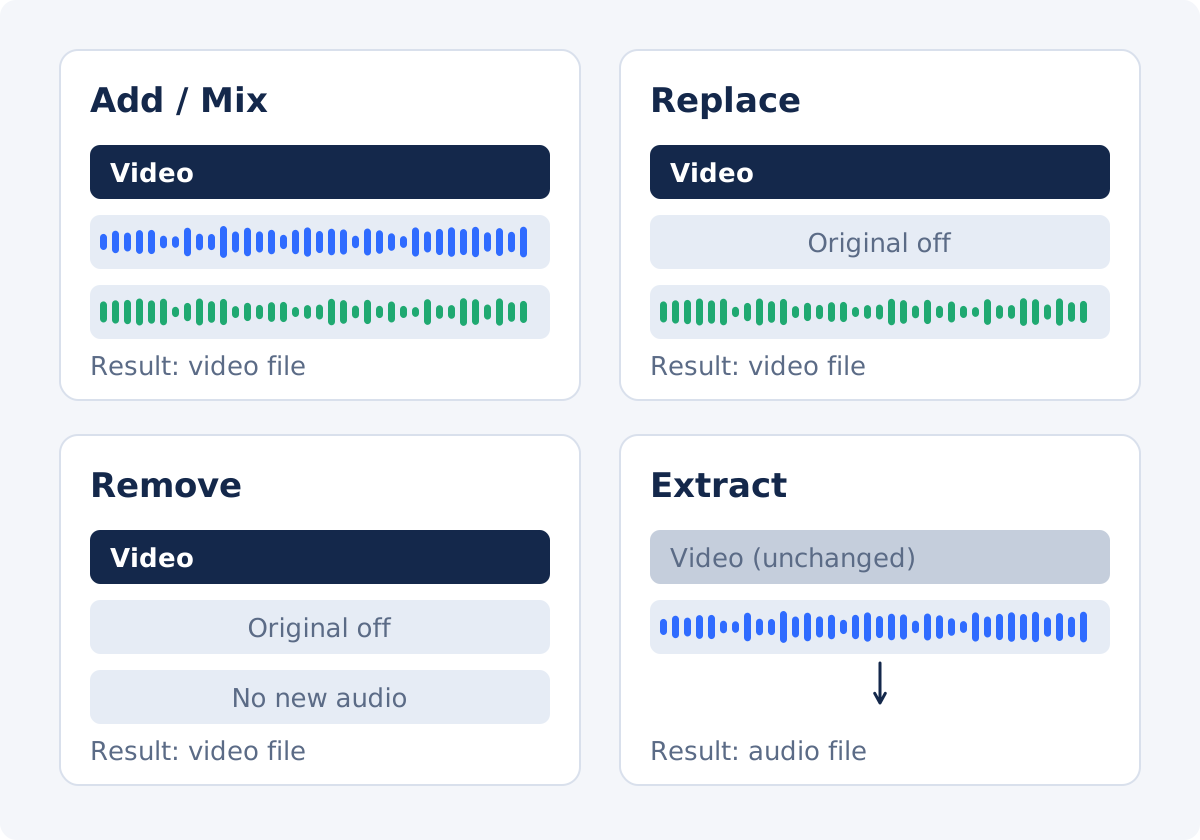
Four operations, four results
The original soundtrack is the audio already stored inside your video file: speech, background noise, music that was playing in the room, or system sounds in a screen recording. Each operation below treats it differently.
Replace: original off, new audio in
Replacing means the finished video contains only audio that you upload. The original soundtrack is switched off, and one or more new tracks take its place. The new tracks can be music, a voiceover, sound effects, or a combination.
Typical reasons to replace: the camera audio is unusable because of wind or traffic, the recording contains music you do not have the right to publish, a screen recording needs clean narration in place of keyboard noise, or the video is being adapted with narration in another language.
In Deus.Video, replacement is done in the Add Audio to Video tool by unchecking Keep original video audio and adding your new files.
Remove: a silent video
Removing produces a video with no sound and no replacement. The picture is unchanged.
Typical reasons to remove: the clip will loop silently on a website or a display, it will be used as b-roll under a separate edit, the background conversation is private, or a platform will add its own sound later. Use Remove Audio From Video for this.
Extract: save the soundtrack separately
Extracting saves the existing soundtrack as its own audio file. It does not change the video you started with. You end up with two things: the original video and a separate audio file.
Typical reasons to extract: you want a podcast-style audio version of an interview, you need the audio for transcription, you want to keep a backup of the original sound before replacing it, or you plan to edit the audio in another program. Use Extract Audio from Video for this.
Add or mix: original stays, new tracks join
Adding keeps the original soundtrack and plays new tracks together with it. The combined sound of all tracks is called the mix.
Typical reasons to add: background music under an interview, narration over a clip with useful ambient sound, or sound effects on top of existing audio. This is also done in Add Audio to Video, with Keep original video audio left checked.
Comparison table
| Goal | Original audio | New audio | Correct tool |
|---|---|---|---|
| Put music under existing dialogue | Kept | Added | Add Audio to Video (original on) |
| Add narration and keep the ambient sound | Kept | Added | Add Audio to Video (original on) |
| Swap a noisy soundtrack for clean narration | Switched off | Added | Add Audio to Video (original off) |
| Swap copyrighted background music for licensed music | Switched off | Added | Add Audio to Video (original off) |
| Make a silent clip for a website or display | Removed | None | Remove Audio From Video |
| Save an interview as an audio file | Saved separately; video unchanged | None | Extract Audio from Video |
| Keep a backup of the sound before replacing it | Saved separately first | Added afterward | Extract Audio, then Add Audio to Video |
| Change the sound only in one section of the video | Edited by section | Optional | Full editor |
Why these are not the same operation
It is tempting to think of replacement as "remove, then add." The result is similar, but the operations are separate for good reasons.
- They produce different outputs. Replace, remove, and add each produce a video file. Extract produces an audio file.
- They treat the original sound differently. Extract preserves it. Remove and replace leave it out of the result. Add keeps it in.
- One step is better than two. You do not need to create a silent video before replacing the soundtrack. Add Audio to Video handles the switch in a single pass, which means one export and one file to review.
One limit applies to all the standalone tools. They work with the original soundtrack as a whole. Add Audio to Video does not edit inside the source track, so you cannot cut a single word out of it, silence ten seconds in the middle, or reshape its waveform there. The original sound is either in the mix or out of it.
Decision tree
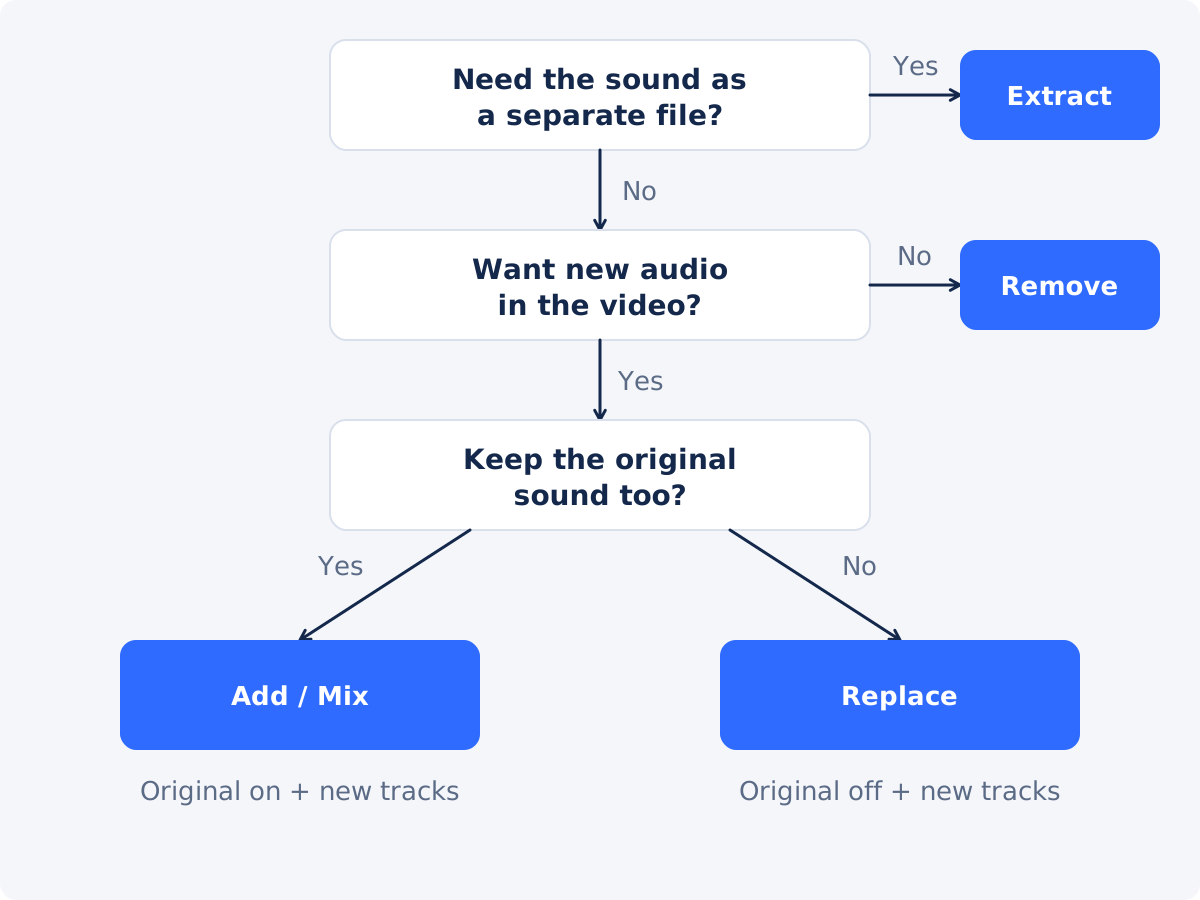
Three questions are enough to pick the right operation.
- Do you need the sound as a separate file? If yes, extract. If you also want to change the video's sound, extract first and then continue with the next question.
- Do you want new audio in the video? If no, and you simply want silence, remove.
- Should the original sound stay under the new audio? If yes, add or mix with the original switched on. If no, replace with the original switched off.
How to replace video audio in Add Audio to Video
Replacement uses the same tool as mixing. The difference is one checkbox. Open Add Audio to Video and follow these steps.
- Save the original sound first, if you may need it. This step is optional. Extract the audio before you begin, so you have a copy.
- Upload the video. Common formats such as MP4, MOV, AVI, WebM, and MKV are accepted.
- Add the replacement audio. Use Add audio files to upload one or more files. Each becomes a separate track.
- Uncheck Keep original video audio. The Current status block has a Video audio line that shows On while the original sound is kept. For a replacement, it should no longer show On.
- Position each track. Track start and Track end set when a track is heard in the video. For a full replacement, the main track usually runs from 0:00 to the end of the video, which is what the Full preset sets.
- Set Audio source offset if needed. This chooses where playback begins inside the audio file, which is useful for skipping a long intro or silence.
- Adjust Volume and fade. Each track has its own volume. A fade is a gradual volume change at the start and end of a track, and it prevents abrupt entrances and cut-off endings. Fades are applied during processing, so check them in the download.
- Preview the whole video. Check that the new audio covers every section that needs sound.
- Process and review the download. Click Add audio to video, download the result, and play it from start to finish.

Things to watch during a replacement
- Length. If the new audio is shorter than the video, the rest of the video is silent. Short audio is not repeated automatically. Choose a longer file, add a second track for the remaining section, or shorten the video before you begin.
- Useful sounds you are about to lose. Switching off the original removes everything in it, including laughter, applause, or product sounds you may have wanted. If those matter, consider mixing instead, or rebuild them with sound effect tracks.
- Several loud tracks at once. When music, voice, and effects overlap, the combined level can distort. This is called clipping. Lower individual track volumes and listen to the busiest moment.
- Rights. Replacing a soundtrack is often done to avoid using music without permission. Make sure you have the right to use the replacement as well. This guide is not legal advice.
When you need the full editor
The standalone tools are built for one clear job on one video. Use the full Deus.Video editor when the task is more detailed:
- You want to change the sound in one section and keep the original elsewhere.
- You need to cut or rearrange the video while you work on the audio.
- You want captions, titles, or other text together with the new soundtrack.
- You need repeated music or a more complex arrangement of several audio layers.
After processing a video in the standalone tool, you can also continue editing the result in the full editor.
Practical scenarios
Windy outdoor footage. The speech is unusable. Record a voiceover indoors, switch off the original audio, and add the narration plus quiet music. This is a replacement.
Interview for two channels. You want a video for social media and an audio version for a podcast feed. Extract the soundtrack for the audio version. The video stays as it is.
Product loop for a store display. Sound will never be played. Remove the audio so no stray noise appears if someone connects speakers.
Event recap with good crowd sound. The atmosphere is worth keeping. Add music at a modest level with the original audio on. This is a mix.
Screen recording with keyboard noise. Replace the original sound with a clean narration file, and position each narration section at the step it describes.
Conclusion
Start from the result you want. A separate audio file means extract. A silent video means remove. New sound with the original still audible means add. New sound with the original gone means replace, which is the Add Audio to Video tool with the original audio switched off. When the change applies to only part of the video, move to the full editor.
Ready to swap a soundtrack? Open the Add Audio to Video tool, uncheck Keep original video audio, and add your replacement tracks.
Frequently asked questions
Do I have to remove the audio before I can replace it?
No. Uncheck Keep original video audio in the Add Audio to Video tool and add the new files. The original sound is left out of the result in the same pass.
Does extracting audio change or delete sound in my video?
No. Extraction saves the soundtrack as a separate audio file. Your video file is not altered, so it still plays with its original sound.
Can I replace only part of the soundtrack?
Not in the standalone tool, where the original audio is kept or switched off for the whole video. For changes to individual sections, use the full editor.
Can I replace the audio with more than one file?
Yes. You can add several audio files as separate tracks, such as narration, music, and sound effects, and position each one on the video timeline.
Will the video picture change when I replace or remove the audio?
These tools are designed to change the sound, not the content of the picture. The result is a newly processed file, so review the download for both picture and sound before you publish it.
Can I get the original audio back after replacing it?
Not from the processed file, because the original sound is not included in it. Keep your source video, or extract the audio before you start, so you always have a copy.


