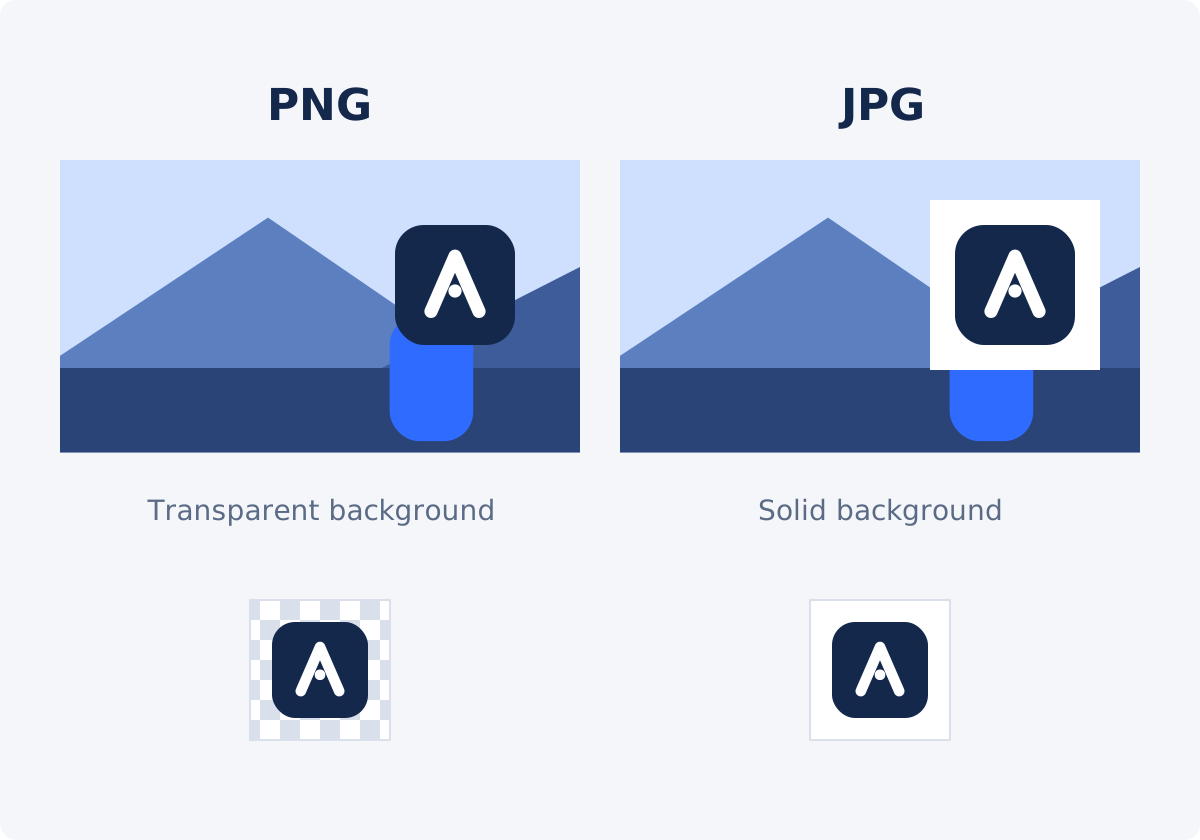
Transparency, compression, and typical use
An overlay is an image placed on top of the video picture. How it blends with the video depends on two properties of its file format.
Transparency
Transparency means parts of the image are see-through. The data that stores it is called the alpha channel. For every pixel, alpha says how visible that pixel is, from fully transparent to fully opaque, with partial values in between. PNG supports an alpha channel. JPG does not. A JPG is always a filled rectangle, and whatever was transparent in the original becomes a solid color, usually white.
Compression
PNG uses lossless compression. The saved file reproduces every pixel of the original. This suits flat colors and sharp edges, and those kinds of images also compress well as PNG.
JPG uses lossy compression. It discards detail that the eye is less likely to notice, which makes photo files much smaller. The cost is artifacts: faint blocks, and smudges around sharp edges. On a photo they are hard to see at sensible quality settings. On a logo or on text they show up quickly.
Typical use
PNG is the usual format for logos, icons, interface graphics, and screenshots. JPG is the usual format for photographs.
Logos, icons, and stickers vs. photos and screenshots
Logos, icons, and stickers
These have irregular outlines, and they should sit on the video without a box around them. They need transparency, so they need PNG. They also have flat colors and hard edges, which is exactly where JPG artifacts are most visible.
Photos
A photo shown as a rectangle does not need transparency, and its soft gradients and textures hide JPG compression well. A JPG at a high quality setting is a sensible choice. A PNG of the same photo works too. The file is just larger.
Product cutouts
A product photo with the background removed is a photo and a cutout at once. Transparency decides it: use PNG.
Screenshots
Screenshots are rectangles, so transparency is not the issue. Sharpness is. Interface text and thin lines suffer under JPG compression, and the blur gets worse when the video is encoded again. Save screenshots as PNG.
Comparison table
| Criterion | PNG | JPG | Better choice |
|---|---|---|---|
| Transparent background | Supported through the alpha channel | Not supported; background is a solid color | PNG |
| Soft, semi-transparent edges and shadows | Supported through partial alpha values | Not possible | PNG |
| Sharp edges, flat color, text | Reproduced exactly | Artifacts around edges, stronger at low quality | PNG |
| Photographs | Accurate, with large files | Visually close at high quality, with much smaller files | JPG, or either |
| Screenshots of interfaces | Crisp text and lines | Smudged text at lower quality | PNG |
| File size for photos | Larger | Smaller | JPG |
| File size for simple graphics | Often small | Can be larger than expected, with artifacts | PNG |
| Repeated editing and re-saving | No loss from re-saving | Each save can add loss | PNG |
| Full-frame rectangular photo | Works | Works | Either |
Source dimensions and perceived sharpness
Format is half of the story. The pixel size of the source image matters just as much, because the overlay is scaled to the size you set and then encoded into the video.
A practical rule: the source image should have at least as many pixels as the area it will cover in the final video. If a logo will be about 200 pixels wide in a 1920-pixel-wide video, a 400- or 600-pixel-wide source gives a comfortable margin. A 90-pixel source would have to be enlarged, and it will look soft in either format.
Going far beyond what you need brings no benefit. A 6000-pixel photo displayed at 500 pixels wide does not look sharper than a 1500-pixel version. It only takes longer to upload.
Keep the proportions when you resize. In the Add Image to Video tool, Width and Height are separate values, and the aspect ratio, which is the relationship between width and height, is not locked. If you change only one of them, the image stretches, and a stretched image looks wrong even when it is sharp.
Why resizing upward cannot create missing detail
Every image contains a fixed number of pixels. When a small image is enlarged, software has to fill the larger area by estimating new pixels from their neighbors. The estimates are smooth averages, so edges blur and fine detail does not appear, because it was never recorded.
Changing the format does not help. Converting a small JPG to PNG preserves the blur and the artifacts and puts them in a bigger file. The fix is always upstream: export the logo again from the vector or design file at a larger size, take the screenshot at a higher resolution, or find the original photo.

Alpha edges and backgrounds
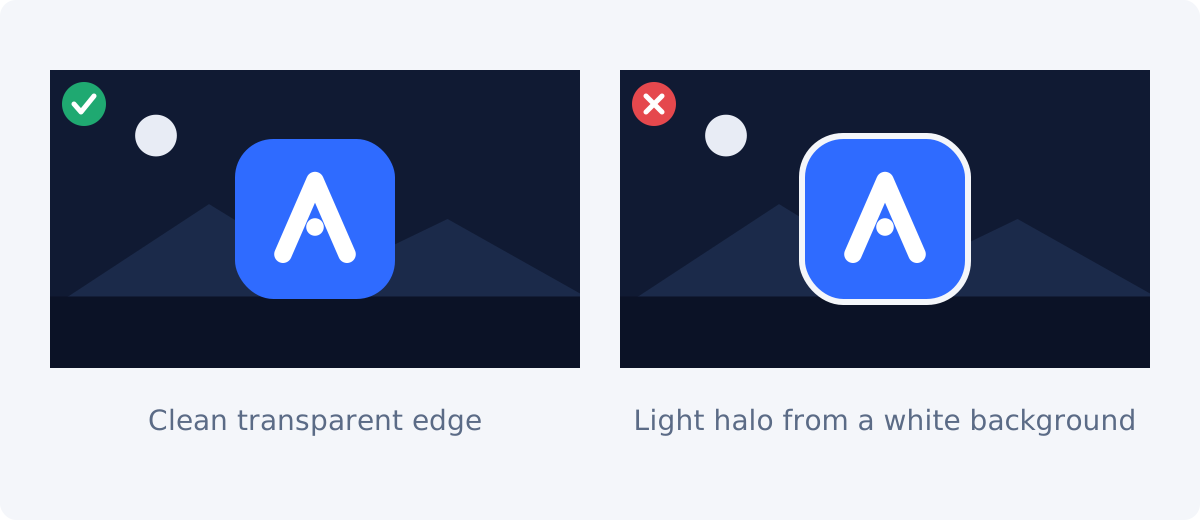
A good transparent PNG has soft alpha along its edges. The outline pixels are partly transparent, so the shape blends into whatever is behind it. Problems appear when the transparency was created carelessly.
- Light halo. If a logo was cut out from a white background, its edge pixels may still contain white. Over a dark video, that shows up as a pale fringe.
- Dark halo. The same problem in reverse: a logo cut from black shows a dark fringe over light footage.
- Jagged edges. If the alpha is only on or off, with no partial values, curves look like staircases.
- Leftover background. Automatic background removal can leave faint patches that you only notice over a contrasting scene.
The Add Image to Video tool does not remove backgrounds or clean up edges. It displays the PNG as it is. Export transparent images from the original vector or layered design file when you can, and test them over both a light and a dark frame of your video. Note that Remove Background from Video is for video footage, not for still images.
File size as a tradeoff
There is no single file size that is right for an overlay, and this guide does not set a limit. The tradeoff looks like this:
- A larger file takes longer to upload and handle, which you will notice most with several layers.
- A heavily compressed JPG is small, but its artifacts are baked in, and they will be encoded into the video again.
- A huge PNG photo costs upload time without adding visible quality at overlay size.
A balanced approach: size the image to roughly one and a half to two times its displayed size, save graphics and screenshots as PNG, and save photos as JPG at a high quality setting. The size of the overlay file is not the same thing as the size of the final video, which depends on how the processed video is encoded.

Workflow examples in Deus.Video
In the Add Image to Video tool, you can add an image to a video online in either format. The steps are the same for both:
- Upload the video.
- Click Add image and choose the PNG or JPG file. It becomes a layer, which is a separate image with its own settings.
- Use a Quick preset (Logo, Sticker, or Center) as a starting point, or drag the layer into place.
- Set Width and Height, keeping the proportions of the source.
- Set Start and End on the timeline, which is the time axis of the video.
- Preview, click Add images to video, and download the result.

Example 1: transparent PNG logo
A 600 × 300 PNG logo with a transparent background goes into the top-right corner. The source is 2:1, so you set a 2:1 size, such as 180 × 90. The video shows through around the mark. You check it over the brightest and the darkest scene.
Example 2: JPG product photo
A 1600 × 1200 JPG photo appears beside the presenter for six seconds. The ratio is 4:3, so a size such as 320 × 240 keeps it natural. It displays as a clean rectangle, which suits a photo.
Example 3: PNG screenshot
A settings dialog is captured as PNG and cropped tightly in an image editor. It is centered and sized large for five seconds, so the text can be read on a phone.
Example 4: the JPG logo that should have been a PNG
A logo saved as JPG arrives with a white box. The tool shows the box, because it is part of the image. The fix is to export a transparent PNG from the source file and replace the layer.
Browser and encoding caveat
The image picker accepts browser-supported image files, including common PNG and JPG images. A file extension does not guarantee that a specific file will work. PNG and JPG both have less common variants, such as unusual color modes or bit depths, and a file with the right extension can still be encoded in a way that a browser or the processing step handles differently. If an image does not show correctly in the preview, save it again from an image editor as a standard RGB PNG or JPG.
Remember also that the final video is encoded after the overlay is placed. Video compression can soften fine detail, especially small text and thin lines. A sharp PNG does not guarantee a sharp result in every case, so check the processed download at the size your audience will watch.
For animated graphics, motion, or a combination of images with clips, audio, and transitions, use the full Deus.Video editor. The standalone tool is for still image layers.
Conclusion
Use PNG when the image needs transparency or contains sharp graphics and text. Use JPG for rectangular photos when a smaller file is welcome. In both cases, start from a source with enough pixels, keep the proportions when you resize, and review the processed video, because neither format can restore detail that the source never had.
Have your image ready? You can create a timed image overlay in Deus.Video and see how your PNG or JPG looks over your footage before you download.
Frequently asked questions
What is the best image format for a video overlay?
It depends on the image. PNG suits logos, icons, stickers, cutouts, and screenshots, because it supports transparency and keeps edges clean. JPG suits rectangular photographs. When in doubt, PNG is the safer default.
Can a JPG have a transparent background?
No. The JPG format has no alpha channel. Transparent areas are filled with a solid color when the file is saved. Renaming a .jpg file to .png does not add transparency either. Export a real PNG from the original design.
Will converting my JPG logo to PNG improve it?
No. Conversion keeps the existing white box, blur, and artifacts. Go back to the original vector or layered file and export a new PNG with a transparent background at a generous size.
Why does my PNG logo show a white outline over dark footage?
The edge pixels still carry color from the background the logo was cut from. Re-export the logo from its source file with proper transparency, or clean the edges in an image editor. The tool displays the file as it is.
Does a bigger image file make the overlay sharper?
Only up to the point where the source has enough pixels for its displayed size. Beyond that, extra pixels are scaled away. Sharpness in the final video also depends on how the video is encoded.
Can I use other formats, such as SVG, GIF, or WebP?
The picker accepts image files that your browser supports, and PNG and JPG are the dependable choices. Other formats may or may not work as you expect, and animation in a file is not something to rely on. Converting to PNG beforehand is the predictable route.


