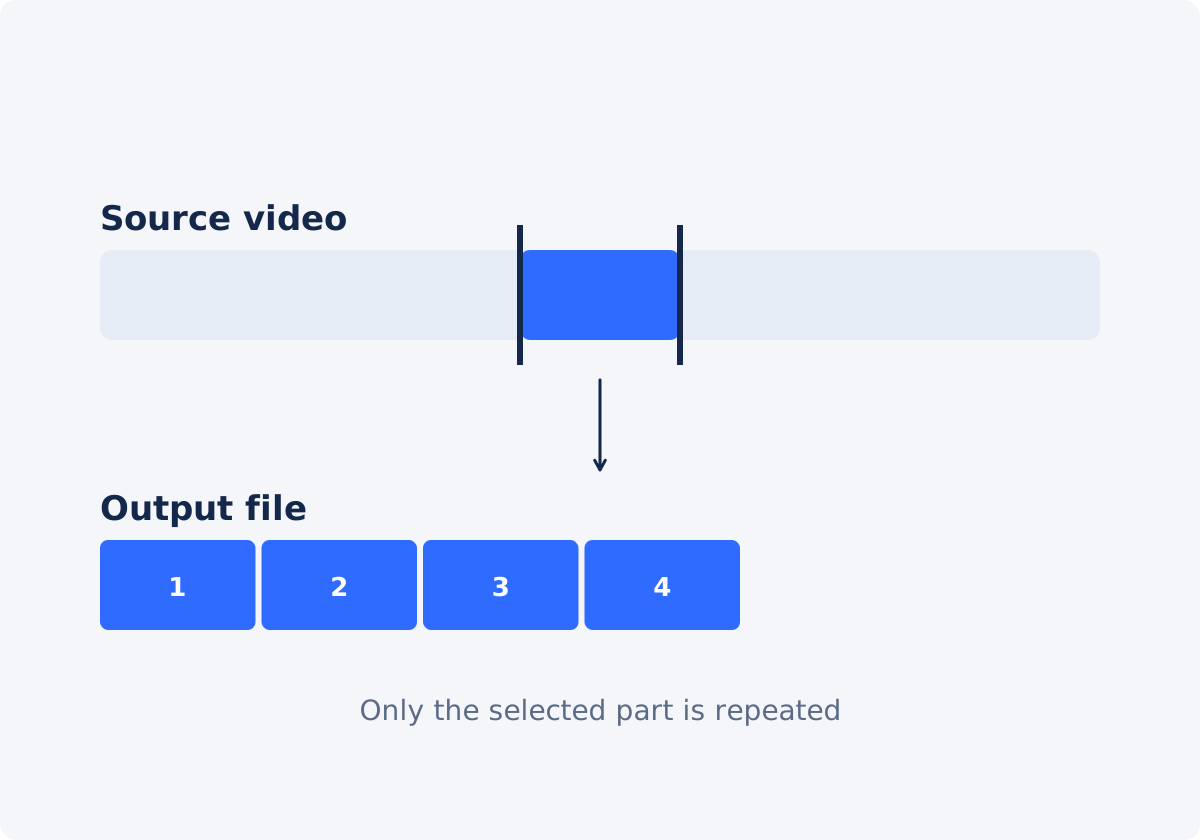
When a partial loop beats repeating the whole video
A loop is a clip that plays again from its start as soon as it ends. Repeating a whole 40-second video gives you a long file in which the interesting three seconds still come around only every 40 seconds.
- One action matters. A button click, a goal, a product turning, a dance move, a reaction.
- The rest of the recording is setup. Walking into frame, adjusting the camera, waiting for something to happen.
- The source contains a natural cycle. One turn of a wheel, one wave, one pass of an animation.
- You need a short file. Three seconds repeated five times is 15 seconds. Forty seconds repeated five times is more than three minutes.
- You are making a background or a display loop, where a distinctive event in the full clip would give the repetition away.
Repeat the whole video when it was already made as a single loopable piece, or when every part of it should be seen each time.
How to find an action that repeats well
- It returns to where it started. A hand goes out and comes back. A door swings and settles. If the end pose matches the start pose, the restart is hard to see.
- It is self-contained. The viewer understands it without what came before.
- The camera holds still. A moving camera puts the background in a new place at the end, and the restart jumps.
- The light is steady. No automatic exposure shifts, passing clouds, or flickering screens inside the range.
- Nothing distinctive happens in the background. A person crossing behind the subject becomes a person crossing every three seconds.
Scrub through the source, and note two or three candidate moments. It is quicker to test several ranges in the preview than to keep polishing the first one.
Setting the range: timestamps, handles, and moving the selection
The tool gives you two ways to define the range, and they stay in sync.
- Start and End fields. Type the times directly. The fields show minutes, seconds, and hundredths, for example 0:06.76, so you can place an endpoint between whole seconds.
- The timeline under the player. The selected range appears as a highlighted bar with handles. Drag a handle to move one endpoint. Drag the selection to move both together and keep its length, which is useful for sliding a three-second window along the clip to find the best spot.
- Whole video. This button resets the selection to the full source.
A practical method is to drag roughly, and then refine with the fields. Get the range close by eye, and then nudge Start or End by a few hundredths while watching the restart.

Leaving or removing pauses at the edges
Where you cut around the action changes how the loop feels.
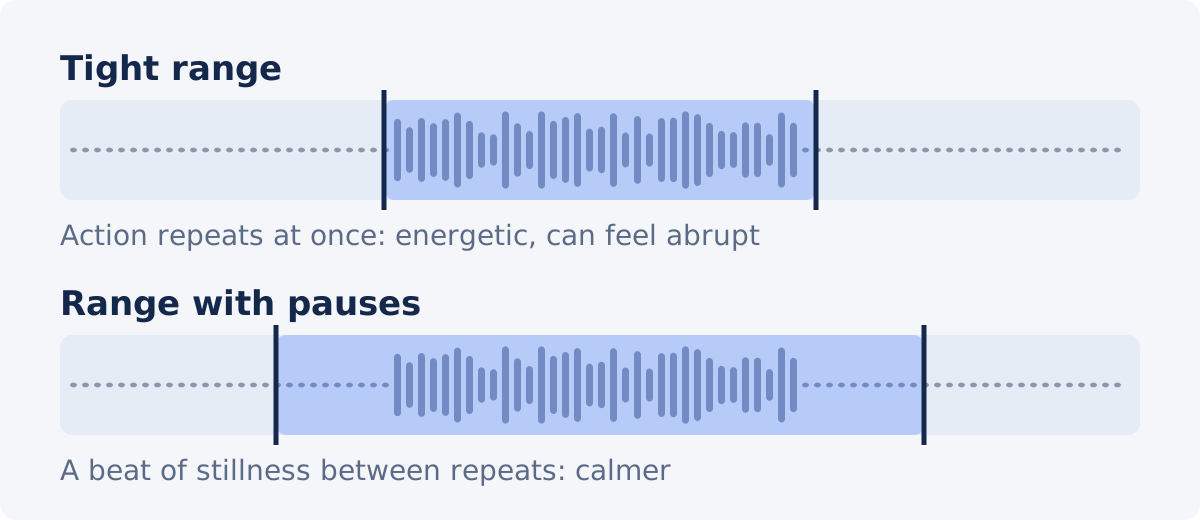
Tight range
Start the moment the action begins, and end the moment it finishes. The action repeats at once, which feels energetic and suits reactions, sports moments, and rhythmic loops. The risk is clipped motion: if you cut a few frames late or early, the movement seems to start in mid-air, or to be yanked back before it completes.
Range with a pause
Include a brief still moment before and after the action, for example a third to half a second of each. The viewer gets a beat to register what happened before it happens again. This suits product demonstrations, interface walkthroughs, and tutorials. The two pauses add up at the join, so keep each one short.
Uneven edges
Often the best result has no pause at the start and a short hold at the end. The action begins immediately, completes, rests, and restarts. Try this first for instructional loops.
Preview the selected range
Press Play with a range selected, and the tool plays that range on repeat. This is the real test, because it shows the restart exactly as the processed file will have it.
- Watch at least four or five passes. Problems that are easy to miss once become obvious with repetition.
- Look at the join, not the action. Does anything jump, flash, or pop?
- Listen as well. With sound on, a clipped word or a music skip is immediately audible.
- Adjust one endpoint, and preview again.
Repeat count vs. target duration
Once the range is right, decide how long the output should be. There are two modes.
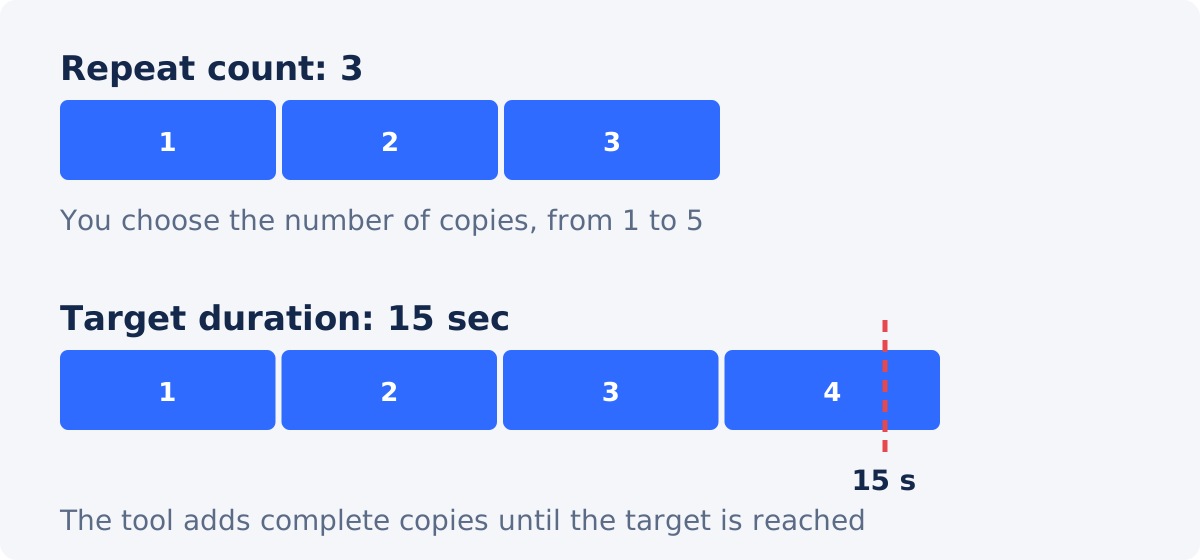
- Repeat count is the number of copies of the range in the output, from one to five. A 3-second range with a count of 4 gives 12 seconds. Use it when you think in repetitions: "show it three times."
- Target duration is a length in seconds, up to 1,800. The tool adds complete copies until the target is reached. It never cuts the last copy short, so the output can run a little longer than the number you entered. A 4-second range with a target of 15 seconds gives four copies, which is 16 seconds. Use it when you think in length: "it has to fill at least 15 seconds."
The quick presets 2×, 3×, and 5× set a repeat count. The presets 10 sec, 15 sec, and 30 sec set a target duration. Whichever you use, the Current status block shows the selected fragment, the resolved repeat count, and the approximate output duration before you process anything.
Step-by-step workflow in Deus.Video
Use the tool to loop a video online, from the full file or from a selected part.
- Upload one video. Common inputs include MP4, MOV, AVI, WebM, and MKV.
- Find the action by playing or scrubbing the source.
- Set the range by dragging the selection on the timeline, then refine Start and End in the fields.
- Press Play, and watch the range repeat. Adjust the edges until the restart looks right.
- Choose a preset or a Loop mode, and enter the Repeat count or the Target duration in seconds.
- Set "Include audio in loop." Keep it selected to repeat the sound with each copy, or clear it for a silent file.
- Check Current status for the fragment length, repeat count, and output duration.
- Click Loop video, and wait for processing.
- Download the result, or continue in the full editor. Play the downloaded file through at least two restarts.
The tool repeats the range as it is. It does not add crossfades, match endpoints, or fade audio. The result is a newly processed file, and re-encoding, meaning the video is compressed again on saving, can change its size or fine detail slightly.
Troubleshooting the restart
| Problem | Likely cause | What to try |
|---|---|---|
| Jump: the subject or background shifts at the restart | End pose differs from start pose, or the camera moved | Move one endpoint to a matching pose; shorten the range; choose a steadier section |
| Flash: brightness or color steps at the restart | Auto exposure or changing light inside the range | Pick a stretch with stable light; shorten the range |
| Clipped motion: the action starts in mid-air or is cut off | Range too tight | Move Start slightly earlier or End slightly later |
| Stutter: a tiny hitch at the join | The last frame duplicates the first | End a few hundredths earlier |
| Dead time: the loop feels slow | Too much pause at both edges | Remove the pause at the start; keep a short hold at the end |
| Abrupt audio: a word, note, or noise is cut | Sound does not loop at these endpoints | Clear "Include audio in loop"; or move the edges to a quiet moment |
| Output longer than the target | Target duration uses complete copies only | Accept it, change the range length, or trim the final file |
| Repeat count will not go above 5 | Limit of Repeat count mode | Switch to Target duration |
When Trim Video comes first
You do not have to trim before looping. Loop Video selects the range itself. A separate trim is useful in a few specific cases.
- You want the short clip as its own file, for instance to let a web page or a player loop it, or to reuse it elsewhere. Trim Video saves one time range without repeating it.
- You plan to use the same section in several tools, such as reversing it for a forward-and-reverse loop.
- The source is very large, and you would like to work with a small file from then on.
Keep in mind that each separate processing step re-encodes the video. If you only need the repeated result, selecting the range inside the loop tool is the shorter path. For crossfades, music, text, or an exact final length, move to the full Deus.Video editor, where a loop is the same clip placed several times in sequence on the timeline.
Conclusion
Looping part of a video is mostly a matter of choosing the part. Find an action that returns to its starting point, set the range with the handles, refine it in hundredths of a second, and decide whether the edges should be tight or should breathe. Judge it in the repeating preview, pick a count or a target length, and check Current status before processing.
Have one moment worth repeating? Open the Loop Video tool, drag the range over it, and watch it restart before you download.
Frequently asked questions
Do I have to trim my video before looping it?
No. The loop tool lets you select a range inside the uploaded video, with Start and End times or by dragging on the timeline, and only that range is repeated. Trimming first is needed only when you want the short clip as a separate file.
How precisely can I set the start and end?
The time fields work in minutes, seconds, and hundredths of a second, so endpoints can fall between whole seconds. Dragging the handles is quicker for rough placement, and typing is better for fine adjustment.
How many times can I repeat the selected part?
In Repeat count mode, from one to five copies. For more, use Target duration, which accepts up to 1,800 seconds and adds as many complete copies as it takes to reach that length.
Can I loop two different parts in one go?
No. Each run repeats one selected range. To combine several looped sections, process them separately, and join the files in an editor, or build the whole sequence in the full editor.
Why is my looped section longer than the duration I asked for?
Target duration is met with complete copies of the range. The last copy is never cut partway, so the total is the first multiple of your range length that reaches the target. The Current status block shows the exact output duration beforehand.
Can I remove the sound from the loop?
Yes. Clear "Include audio in loop," and the output is silent. With it selected, the audio of the range repeats with every copy, which can sound abrupt at the restart if the range cuts through speech or music.


